How to make virtual reality glasses. How to make DIY virtual reality glasses. Cutout template for virtual reality glasses
I love the guys from Google. Well done they are. Properly set enlightened brains and good motivation are sometimes able to squeeze absolutely brilliant ideas out of a person. Simple as 3 kopecks and at the same time absolutely stunning. An example of such a brilliant mind blowing idea is undoubtedly the Google Cardboard virtual reality glasses.
Everything ingenious is simple - a piece of correctly folded cardboard, two penny lenses, a smartphone with a large screen and a set of sensors - that's virtual reality glasses for you. Considering that many people already have such a smartphone in their pocket, the price of the issue is only 150 rubles and 2 hours of free time for assembly and gluing.
It would seem - somehow simple ... But it works! And how! 3D games, 3D movies, educational apps and virtual travels - please! With the simplicity, genius of the approach and the price of the issue, the Googlers put all the developers of all sorts of Oculus Rifts into the belt and so on. The same virtual reality, only almost for free. It may look ugly, but it works. And the appearance, if desired, can be plastic-licked, just look at the famous Chinese site - there are a lot of analogue options, a price tag of 700 rubles and more, with different functionality, adjustments and air holes ...
Any smartphone running Android 4.1 Jelly Bean and above, iOS 7 and above, or Windows Phone 7.0 and above with a screen size of at least 4.5 inches is suitable for the glasses. The smartphone must have the following sensors: gyroscope, accelerometer, magnetometer (digital compass). IMPORTANT! The gyroscope and accelerometer are required for most applications to work, otherwise you will only be able to watch 3D movies. It is impossible to evaluate virtual reality without a gyroscope and an accelerometer.
I recommend everyone who has such a smartphone to try this thing. Believe me, it's great. For those who do not want to bother with cardboard and scissors, I can recommend buying a ready-made Google Cardboard on aliexpress.com. For those who are not looking for easy ways - you are welcome here, I will tell you how you can make such a thing quickly and without pitfalls.
Currently there are 2 versions of Google Cardboard. I will tell you how to assemble the second version a little later, in a separate post, but now we will talk about the easiest to manufacture - the first version. Google, as a real corporation of kindness, did not stint and posted all the information on this invention to the public.
So, what we need to make this wonderful device:
1. A sheet of hard cardboard. It is best to use microcorrugated cardboard, which is widely used for the manufacture of boxes, containers, packages, etc. It looks like this:
 |
 |
 |
Personally, I used cardboard, from which a stationery box for papers is bent with cunning manipulations. This box is sold in stationery in the form of a flat cardboard sheet (it is proposed to bend the box from it yourself). The cardboard is good, about 2 mm thick (I do not recommend taking thicker), it is excellently cut with a clerical knife and bends without much difficulty. Here's what it looks like:

However, you can use any packaging, even from pizza. The box from the motherboard, for example, is well suited. The main thing is that the cardboard should be dense, and not thick (2-3 mm maximum), otherwise problems with dimensions will begin.
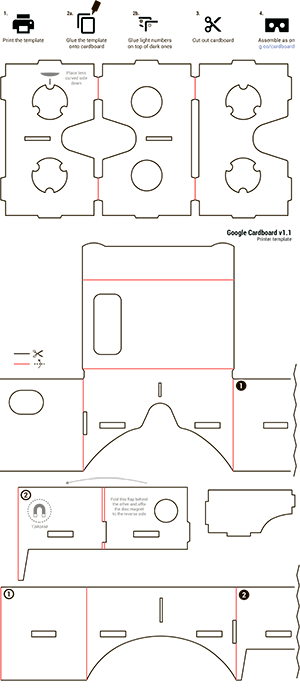
2. Template for cutting points, printed on plain A4 stationery paper (3 sheets will be needed). This template can be found on the Internet, or download here:. This pdf-file is printed on any laser printer, the parts are cut out with scissors and pasted onto a sheet of corrugated cardboard. Since the unassembled Google Cardboard is longer than an A4 sheet, the template is cut so that the cut pieces need to overlap when glued together. These parts are marked with a circle with a number. It is necessary to superimpose a light (unshaded) circle on a filled one with the same number and monitor the coincidence of the lines.
3. Lenses in the amount of 2 pieces. This is the most difficult moment. The parameters of the lenses are aspherical, diameter 25 mm, focal length 45 mm. The complexity of the moment lies precisely in where to get such lenses. Consider the options:
- aliexpress.com is the best option for the price, but the longest time. For my second glasses, I ordered there, they came in 19 days, this is a speed record, because usually everything lasts a month or two or three. If this option suits you, look for “google cardboard lens” there
- Search for the same in the Russian segment of the Internet. The speed will be faster than China, but the price will be higher.
- Shops "Optics" in your city. Yes, you can search there too. This is probably the most expensive option, I don't know, haven't tried it. Salespeople in optics won't understand if you say "aspherical lenses, diameter 25mm, focal length 45mm". They need to speak differently. Since they are all measured in diopters, you will need to ask for lenses with diopters. Now we will calculate them: there is a formula F = 1 / D, where F is the focal length in meters, and D is the optical power of the lens in diopters. Thus D = 1/F = 1/0.045 = 22.2222. In general, you need to ask for lenses "+22 diopters". If there are any, then they can be turned there to the desired diameter, or, with a larger diameter, but then the template will need to be slightly changed.
- Stationery stores. In it we are looking for magnifiers of suitable size (i.e. magnifying glasses), the higher the magnification, the better. 10x lenses should fit. This option is the most unreliable, because it is difficult to find 2 identical magnifiers, and even so that they fit in the focal length. However, this was the first option I tried.
- Various kinds of binoculars, children's toys, lenses, spyglasses, junk men in the markets, in general, we are looking for where we can.
The first 3 options are ideologically correct, because they imply an exact match with the design proposed by Google. The rest of the options give the lenses inaccurate, so they will require a change in the design of the glasses themselves. More clearly show in the picture:
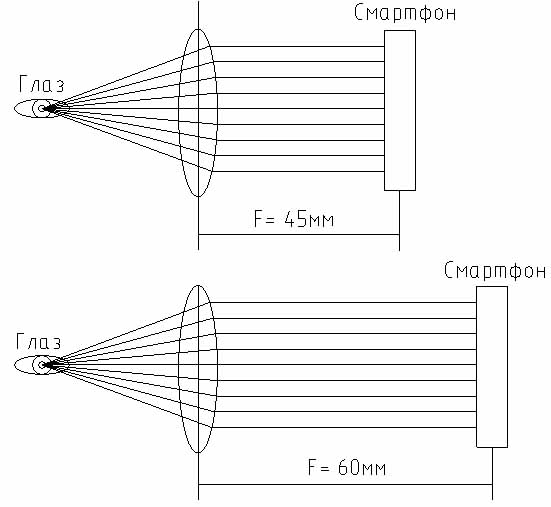
It follows from this picture that the larger the focal length, the further you need to move the smartphone away from the lens. Thus, if you got non-native lenses, make changes to the design. This is exactly what I had to do the first time I bought lenses at the stationery. It's not difficult, I will describe the details in the next post, which is entirely devoted to my first Google Cardboard option.
What to do if the focal length of your lenses is unknown? There are two ways: either make the design initially with adjustment of the distance from the lens to the smartphone, as I did in my first version, or measure it. You can measure the focal length in a simple old-fashioned way: 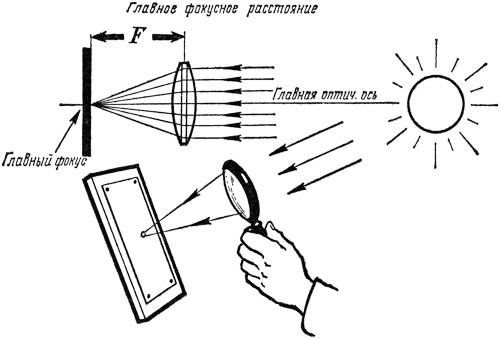
Were you burned with glass as a child? Wow, same thing. We take a lens and focus the sun to a small point on the surface. The distance from the surface to the lens is equal to the focal length. The surface must be perpendicular to the optical axis.
So, about the lenses so far.
4. Magnets. This item is optional to begin with. The design uses 2 magnets that work like a button. One magnet, round flat, ordinary, made of ferromagnet, is inserted inside the structure, the second, ring-shaped neodymium, is molded outside and held there by the magnetic field of the internal magnet:

In order to control virtual reality and use this non-button. When we need to somehow influence the virtual world, we must slide the outer magnet down with our finger and return it back. A smartphone must have a magnetometer (there must be a built-in compass, roughly speaking) in order to catch a change in the magnetic field and perceive it as a button press.
I say right away that it’s a crazy idea and Google itself understood this, because the second version of the glasses already has a mechanical button, but more on that in the corresponding post. In the meantime, I’ll say that you can do without these magnets, especially since this idea works so-so - people complain that not all smartphones correctly capture changes in the magnetic field of this quasi-button, and some smartphones don’t have a magnetometer at all.
In general, I leave it to your discretion, I did not put magnets on myself. When my first version worked, I made a mechanical button.
5. Velcro. Well, everything is simple here - we go to the studio and buy a Velcro fastener there, they are sold in the form of a tape, by the footage, the price is mere pennies.
6. Utility knife and double sided tape.
The process has started!
So, everyone bought / picked up / collected. Let's get started.
1. We print the template and stick it on cardboard.
2. Cut out the details, make the necessary cuts
3. We collect. I'm attaching a video to make it easier to assemble:
This drawing of cardboard virtual reality glasses is based on a sample published in the New York Times in November 2015. The updated version of DIY Cardboard allows you to use larger phones and a button to control the phone, instead of magnets.
You can download the drawing from this link.
You will need:
- Cardboard paper measuring 5cm by 7.5cm, 2mm thick. I used a shoe box and a pizza box.
- A pair of biconvex lenses with a focal length of 45mm, with a diameter of either 25mm or 37mm. There is not much difference, but 25mm is cheaper and easier to get. For example, you can order if you are not confused by the delivery time.
- Copper foil for button.
- A small piece of dense foam/sponge (approximately 6.3mm by 6.3mm by 2.5mm), like those used to pack electronic devices.
- Cutting tools.
- Glue. It is better to use glue stick.
- Velcro (about 7.5cm, cut into 3 pieces)
- metal ruler
- Cutting board or other work surface.
Step 1: Glue the Template and Cut Out the Outer Pieces


Cut out and cover with cardboard. You should have two large pieces (1 and 2), two small ones (3 and 4) and a button. Don't cut out the interior parts, like the holes for the lenses, just yet.
Step 2: Folding


Define and lightly mark the fold lines with a pencil, and then, pressing the edge of the ruler against the line, fold the cardboard towards you, except when directed to do the opposite, such as a moving shutter with a button (see the fold direction on the template).
Step 3: Adjust and customize

Adjust the folds and cuts to make sure everything matches up. Especially pay attention to the part where your eyes will look and to the front of the glasses where the phone will be inserted.
Step 4: Cut Out the Holes

I suggest you cut holes in the outer layer first and make sure those holes line up with the inner layer when they are folded and assembled in the final position, because depending on the thickness of your cardboard and your cutting skills, the cardboard pieces may not line up a bit. when the pieces are put together.
Step 5: Adding a Button

The button is a "pyramid" attached to a movable shutter that you can push down. At the top of the pyramid there will be a sponge (for a soft touch) overlaid with a conductive copper foil strip to transfer a small current from your finger to the screen. If you wish, you can skip this step and operate your phone manually through the nose hole. On the damper, bent inward, we glue the button at a distance of about 5 mm from the place where the phone will be located.
Step 6: Color as desired

If you want to color your cardboard VR glasses, now is the perfect time. It is best not to paint the surfaces you will be gluing.
In case you don't want to paint the glasses, cover the cutout under the nose with tape, as during viewing, the cardboard will become greasy around the nose and then everyone will be sure that your glasses are made from a pizza box.
Step 7: Glue the Sponge and Copper Tape


Cut a piece of copper foil the width of a sponge and glue it as evenly as possible. Then cut a strip 5 cm long and wrap it around the bottom of the sponge, over the pyramid to the base. (Tip: It's best to peel off the foil a little at a time, as it tends to curl, wrinkle, and stick to itself.) Then, cut another piece about 12 centimeters long and attach it to the base on top of the moving shutter.
Step 8: Inserting the Lenses


Glue the inner (3) and middle (2A) parts that form the front surface and insert your lenses with the curved side forward (towards the phone screen). Then glue the outer panel (1B) making sure they fit together well when folded up.
Step 9: Final Assembly


Glue part 4 to the inside of part 1B, make sure you don't glue the flap for the button (I'm loosely pressing it in the first photo). If the flap does not fit freely, carefully trim the 3 free edges as needed. The final view will be as in the second photo, except for the still missing part with the button.
Fold the top of the phone section, aligning it with the outer layer of this section (2A) and glue it. After, fold and glue two pairs of small side panels (my finger is holding the right one so you can see it).
The large 2B side panels and 1A phone cover do not stick together as they will use Velcro to hold them.
Step 10: Install the elastic bands and Velcro


Velcro keeps the front panel and foldable side panels. In principle, if you are not going to lay out the glasses, you can glue the side panels. If you have carefully cut out the Velcro and holes for them, they will sit flush.
The rubber band is necessary to keep your phone from sliding sideways.
Download the virtual reality app and insert your smartphone. You can optionally use a head strap, but for complete immersion, it is highly recommended to use headphones.
At the latest I / O conference, Google showed its version of virtual reality glasses made of cardboard. In principle, schemes for such glasses have been circulating on the Internet for a long time (for example, FOV2GO). However, the scheme of the guys from Google turned out to be simpler than analogues, and they also added a chip with a magnet that works like an external analog button. In this post, I will share my experience of assembling smartphone-based virtual reality glasses: Google Cardboard made of cardboard, OpenDive made of plastic, and laser-cut acrylic glasses.
materials
- Cardboard. I used an unused laptop box. Another option is to order your favorite pizza or buy cardboard in a special store (you can search for microcorrugated cardboard E on request).
- Velcro. Buy at any sewing store. I took a sticky Velcro tape for 100r. Such a ribbon is enough pairs for 10 points.
- Magnets. In principle, this thing is optional if you do not plan to use the Google API. Google itself recommends taking 1 nickel and the second ferromagnet. In our Internet, there are a lot of such magnets in specialized stores, but I was too lazy to wait for an order. As a result, in the same store I took a set of magnets for fasteners, however, they did not work perfectly for me. Cost - 50r for 3 magnets.
- Lenses. In general, it is recommended to take lenses 5-7x, 25mm diameter, aspherical. It's easiest to get a magnifier with two lenses, like Veber 1012A, it's cheaper than buying 2 identical ones. I only had a 30x magnifier with two 15x lenses at hand (I took such a magnifier on the market for 600 rubles). Despite the exaggerated increase, it turned out well.
- Rubber band and carabiner. You will need it if you plan to use the Cardboard as glasses, and not hold them with your hand all the time. I bought in the same sewing store for another 100 rubles 2 meters of elastic and a pair of carbines.
- Foam rubber. So that the glasses do not crash into the face, it is worth pasting over the contact points with foam rubber. I used window tape. Another 100 rubles in the construction market.

The final price of materials: 400-1000r depending on the lenses.
Tools
- Stationery knife.
- Hot glue (gun). Better small.
- Stapler or thread with a needle.
Assembly
Here, in general, everything is trivial.- We go to the Google Cardboard website and download the diagram for cutting. If you suddenly have a laser cutter on hand, you can cut on it. If not, then print on the printer and cut out along the contour.
- We attach Velcro. In addition to the two Velcro in the original, I added one on the left side so that the structure does not move apart. And I also pasted two Velcro on the sides, on which we will later glue an elastic band for attaching to the head.
- We insert lenses, a magnet and fold the structure.
- We fasten 2 pieces of elastic band to Velcro. At one end, we insert a carabiner at a fixed distance (I fixed it with a stapler on an elastic band :)). On the other side, we take an elastic band with a margin and fasten the second part of the carabiner with the ability to adjust the length.
- Success!

However, after installing the application, I discovered that my button does not work in this form. To activate the press, I had to take the magnet in my hand and drive it right along the left side of the phone, however, even this way it works every other time. A sign that you are doing everything right is that when you touch it, there should be a sensation of a magnetic field, which slightly repels the magnet from the phone.
Perhaps the reason is that I took too weak a magnet. Perhaps that my model (Galaxy Nexus) is not declared by Google as supported. Nevertheless, the demos are working, the button is pressed, hooray!
plastic model
If you want to spend as little as possible with the assembly and you have a 3D printer (or enough money to order a print), then this option is for you. :) I printed the model from the Thingverse website. In the same place, for the query “virtual reality”, there are several more similar options.
I ordered printing from the 3D Printing Laboratory, it turned out about 3000 rubles.
All materials from Cardboard are also relevant for these glasses, so the final price tag reaches almost 3500 rubles.
Building a plastic model
We insert the lenses, glue the foam rubber, we take ordinary office rubber bands to mount the phone. You can also seal the entire surface outside the lenses with foam rubber, then you will not be disturbed by the light from the smartphone. Larger lenses can also be inserted into such glasses.

Another option: insert lenses from a Soviet stereoscope. To do this, you will have to slightly modify the mount by replacing round holes with rectangular ones. The option with a stereoscope is quite convenient, but it has a minus - the working area is smaller, the image is cropped from above and below.

Acrylic (or plywood) model
Even before collecting virtual reality glasses became a trend, a wonderful scheme of glasses cut on a laser cutter appeared on the net. Without thinking twice, I decided to order their cutting in the same laboratory. They didn’t have plywood at that moment and they offered me to cut it out of black acrylic. The cost of cutting together with the material turned out to be about 800 rubles.
In addition to lenses, rubber bands and foam rubber, for assembly you will need about 20 screws with 3-4mm nuts (the author of the model suggests using 4mm, but I had difficulty getting them in and I took 3mm).
Oddly enough, the final version turned out to be even better than on a 3D printer. First, the glasses are lighter and more compact. Secondly, the material is smooth and more pleasant to the touch. Of the minuses - acrylic is a rather fragile material, and such glasses may not survive a fall.

Conclusion
Unfortunately, there is still not enough content for such glasses. You can try to play around with streaming, as described in a recentThree-dimensional images have always attracted people with their unusualness and proximity to natural perception. Going to the cinema, many people prefer to go to the session with 3D technology, as this allows them to immerse themselves in the atmosphere of the film as much as possible.
How to make DIY virtual reality glasses
Google Cardboard assembly kit. Everything except lenses can be made by hand
Today, there are many technologies for creating surround perception, but most devices are expensive. Is it possible to make VR glasses at home, and what is needed for this? In principle, quite a bit: ordinary stationery, which is easy to buy in a nearby store. The situation is more complicated with lenses, but you can also find this part if you wish - the easiest way is to order from the Chinese on Aliexpress.
First of all, it is important to understand that virtual reality glasses for a phone should be made with the utmost care, in strict accordance with the drawing. With the slightest deviation from the scheme or the use of the wrong materials in the manufacture of virtual reality glasses from cardboard, the desired effect will not be achieved.
What materials are needed

Many people ask if it is possible to make full-fledged virtual reality glasses out of paper? In principle, yes, if this paper is very dense. It is better to stock up on normal cardboard for such purposes if you are not making the device for a couple of weeks. In order for the device to look more or less aesthetically pleasing, use double-sided cardboard - on the one hand, the usual matte, on the other - white glossy.
It is not difficult to make a virtual reality helmet with your own hands. For this you will need the following materials:
- thick quality cardboard
- sharp utility knife
- round lenses for a virtual reality device (it is better to order on Aliexpress)
- Velcro or other fasteners for cardboard
It is better to cut out the details with a clerical knife, since it is difficult to work with thick cardboard with scissors without the formation of torn edges.
Virtual glasses made of cardboard will last much longer if the material is dense and uniform. It is not recommended to make a helmet from corrugated cardboard, as it will begin to delaminate over time and will quickly become unusable.
Google Cardboard Drawing
To make a fashion device, you will need an exact drawing of virtual reality glasses, which can be downloaded on the Internet by entering cardboard, VR glasses or something like that into the search box. In the same way, you can later find the necessary smartphone application in the store for your platform.
Schemes for virtual reality glasses made of cardboard, drawings and drawings are presented in a convenient form. All you need to do is download them to your computer, print all the details on a printer (on plain paper), and then transfer the resulting patterns to cardboard. Following the diagram and using the drawing, you will get the device of the correct dimensions in the right proportions.
Assembling points
In order to make a virtual reality helmet, you should carefully cut out all the details of homemade VR glasses from cardboard, bend them in the indicated places and assemble the whole structure together, according to the attached instructions. Pre-prepared lenses should be inserted into special holes and fixed.
As a result, you should get a neat and compact box, in shape and size reminiscent of the original device for viewing 3D media.
Phone setup
In order to enjoy the full viewing of media files in the new device, you will need special software for your smartphone - for example, Google Cardboard, which can be downloaded from mobile Internet markets. After installing the application, launch it, select the necessary materials, secure the phone well in a homemade helmet and start watching.
Things to do in a helmet

After assembling the device, most users have a natural question: how and what to watch, is it possible to turn on games, etc.? By downloading a special application for Android or iOS, you can watch movies with 3D support, as well as run certain games.
In order not to hold a homemade helmet in your hands, you can attach a pair of comfortable straps to it for a strong fixation on your head. Do not forget about the secure fastening of the smartphone in the device - the cardboard cover into which it is inserted should be provided with double-sided Velcro for clothes, buttons or other fasteners.
Conclusion
If you have minimal skills in making homemade devices, the question of how to make virtual reality glasses will not take you by surprise. Having at hand a minimal set of stationery and materials, you can make 3d glasses for your smartphone with your own hands, and this device in terms of its functionality is not much inferior to expensive counterparts.
As for the external characteristics - everything is in your hands. Paste homemade glasses with beautiful paper, paint the gadget in bright colors, turn it into a monster of new technologies, and surprise your friends and acquaintances.
At first glance, the assembly scheme looks quite simple - a regular smartphone and a pair of lenses. However, in reality, everything is much more complicated, if only because the process will require quite serious knowledge in the field of optics.
Let's not forget that huge efforts and funds are invested in the development of the devices we are considering, most of which is aimed at finding components that are optimal for the user's eyes.
If you are interested in the question “How to assemble Google Cardboard glasses?”, Then we bring to your attention the simplest version of the concept of self-assembly of virtual reality glasses.
Do-it-yourself Cardboard Assembly Scheme
Firstly, we need a smartphone running OC Android with a special Cardboard application installed on it, a sheet of cardboard, adhesive tape, a ruler, a pencil and a knife. As you can see, nothing complicated. In this case, in the end we get a fully functional device. Don't forget to download Cardboard drawings with an electronic version of the template. The whole thing takes three A4 sheets and must be pre-printed on a printer.
Cardboard scheme for printing
First, we turn a sheet of cardboard into a VR glasses case. The easiest way to do this is with scissors. The result should be three walls: left, right and back, the front is not required.
The next design element is two biconvex lenses. The longer their focal length, the better (optimally - 40 mm). Do not forget to make holes in the back wall of the case for their installation. Next, we fix the optics with adhesive tape.
After that, you can start adjusting the image. To do this, you need to place the smartphone with the display towards the lenses and, moving it in different directions, determine the position at which the image clarity will be maximum.

The Cardboard app lets you watch videos or launch Google Street View, a panoramic scene viewer that lets you take virtual walks through distant metropolises.
Technology needs investment
The scheme of the device of virtual reality considered by us earlier is extremely simple. Helmets from the world's leading manufacturers are distinguished by a much more complex design and "advanced" functionality. Our sample can not boast of having a gyroscope and an accelerometer, or the wear resistance of the case, or ergonomics. We strongly do not recommend that you use this device for a long period of time, it may be unsafe for the eyes, since no optics specialists took part in the assembly process.
However, even if superficial, but very revealing impression of the operation of such devices, the gadget we have assembled still gives. In addition, it is an incredibly rewarding experience to make virtual reality glasses on your own, the characteristics of which are quite comparable to the best factory samples.
To ensure the operation of the glasses, only special lenses and a software package were required, which allows you to track the position of the user's head in space and performs general control of the system.
However, in order to get a truly high-tech device, the ability to assemble at home alone will not be enough, you will need a serious, well-organized and well-funded business project.
The last notes:
- 19.12.2016 You have not yet become the owner of virtual reality glasses, but are you seriously thinking about it? Then this article is for you. All such devices can be divided into four types: Cardboard glasses (Google Cardboard) It is unlikely that […]
- 10/08/2018 Cars from the USA on sweetcars.com.ua are profitable, here you can order an American car. After all, the cost of a used car abroad is much cheaper than here. And the price for the services of the company's employees is quite affordable. To […]
- 01/09/2019 LaCie Mobile's new portable hard drives are officially unveiled, featuring an advanced USB Type-C port that can transfer data at high speeds. The developer is sure that such a product will appeal to those […]
- 01/13/2019 Sony has released a smartphone with excellent stuffing. Sony's new flagship is based on Snapdragon 855. The memory set consists of 6 GB of RAM and flash with a maximum of 256 GB. The battery has a capacity of 3900 mAh. Sony's expected flagship […]
- 10/02/2018 Designing kindergartens in the author's workshop Kolyadenko The architectural workshop "Kolyadenko" provides services for the design of microdistricts, buildings and structures, hospitals, clinics, kindergartens, schools, parks and squares. Order […]