How to connect usb modem. Internet connection via wired modem
Mobile technologies do not stand still, gadgets become obsolete, and the needs of network users for fast data exchange are growing. What to do if the phone does not support modern communication standards? Buy a new one or put up with lagging behind progress? It turns out that through a portable communication device, you can access the network not only from a computer. Consider how to connect a USB modem to an Android smartphone.
The task is not as simple as it seems at first glance. The following errors may occur:
- There is no "Mobile networks" item in the settings of the Android device. You need to look for other firmware versions, otherwise you will not be able to connect the modem.
- Not enough food. As an option - use with a fully charged battery, buy a better cable or USB-hub with external power.
Necessary equipment
Is it possible to connect a modem to the phone without buying additional equipment? Only if the device has a USB port. This is more typical for tablets. In other cases, you will have to purchase an adapter from USB to your phone's connector. And it should not be an ordinary cable, but an OTG so-called host adapter. It is designed specifically for external devices, and not just pairing a mobile phone with a computer.

You also need to purchase the USB modem itself, which consists of a communication module (3G or faster 4G) and a flash drive where the connection settings are recorded.
Modem setup
Before we tell you how to connect a USB modem to your phone, let's figure out how to configure the modem mode itself. If this is not done, then it will be recognized by the Android system simply as a carrier of information.
For Huawei and ZTE phones, the task is easier, a special software. It is enough to run it and put the necessary checkmark. For all other phones, you need to make the following actions:

Preliminary setup is completed, now let's move on to how to connect a 3G modem to an Android phone.
IMPORTANT. If you want to use the device on a computer, then the changed settings must be returned back. Repeat all the instructions, but enter the following command in the terminal: AT^U2DIAG=255.
Smartphone setup
After pre-training you can go to setting up your Android smartphone.

If all the points are completed successfully, then it was possible to connect the modem to the smartphone. However, mobile device manufacturers are not happy with the situation when, instead of buying a more expensive and modern gadget, a potential consumer finds how to reconfigure a 3G modem so that it can be connected to an Android phone. And it creates software obstacles for this, artificial restriction of access.
To get around these restrictions, you need to get root rights on the system. Almost the same as administrator rights in Windows. The presence of such rights allows you to change or delete the system files of the device. To install root, download a special application and follow the instructions to set it up.
IMPORTANT. Getting root rights often threatens to void the warranty of the smartphone manufacturer. Think carefully before you decide on such manipulations with your gadget.
Here, perhaps, are all the nuances of how to connect a USB modem to the phone, configure it for correct operation using special software.
Some time ago, I described the problem when programs, toys or movies spontaneously minimize to the taskbar, the reason for this was the “background” activation of the Connect Manager program update. This program is included with the USB modem from MTS - and performs the functions of an Internet connection manager.
And why not abandon this program altogether? Create an Internet connection manually using Windows. What will it give us? Firstly, we will save the memory and processor power of the computer. Connect Manager will not load, and secondly, we will save your nerves - programs will not be minimized to the system tray.
BUT there is one small obstacle - when installing Connect Manager`a, drivers are automatically installed on the modem. You can get around this obstacle by downloading drivers for your modem from the Internet earlier (there are universal drivers for certain manufacturers on the network that are suitable for most modem models) and later, after removing the connection manager, first install the drivers on the modem, and then create an Internet connection . Or look for drivers on the modem itself, I had this file: DriverSetup.exe
Small note: In Windows 7, it is advisable to run the driver installation in xp sp3 compatibility mode, or try as administrator. Drivers from Windows XP 64bit are suitable for Windows 7 64bit. Drivers for Vista - compatible with Windows 7.
If there is no automatic installation, you need to specify the path to the previously unpacked drivers (the path to the folder with the drivers).
So I'll show you how it's done in pictures.
First of all, open START -> Control Panel -> Network Connections

Open the New Connection Wizard, if your window does not look like this but with a panel, then select “New Connection” in the information panel.

The New Connection Wizard starts with a start page that describes options for connecting to the Internet.
 The next window presents options for connecting to possible networks. Since we are connected to the Internet, we select the appropriate item.
 We will create a connection manually by entering all the necessary connection parameters
 Let it not scare you that we are creating a connection through a regular modem - we will use our native USB modem at the highest possible connection speed.
 Just the same at this stage, we specify our modem as the connection source. I note that you can create several connections through different modems. If you have only one USB modem, then this window may not appear. The system will choose it by default.
 Connection name - here we write for ourselves what our connection will be called so that we can understand later. Can be called by any name.
 Phone number to connect - it must always be specified. For different telecom operators providing Internet services, the dial-up number may be different.
 Enter login and password to connect
MTS: Login: mts, password: mts
Megafon Login: gdata, password: gdata
Beeline Login: beline, password: beline
 The connection settings are completed - the final stage - check the box to create a connection shortcut on the desktop. If not set, the connection is still being created exactly and it can be seen in the control panel - network connections.
 This is how the connection window looks like - by clicking on the call button, a connection is made. You can also view and, if necessary, change the properties of the connection.
 That's probably all - the connection has been created, you can use it.
Mobile technologies do not stand still, gadgets become obsolete, and the needs of network users for fast data exchange are growing. What to do if the phone does not support modern communication standards? Buy a new one or put up with lagging behind progress? It turns out that through a portable communication device, you can access the network not only from a computer. Consider how to connect a USB modem to an Android smartphone.
The task is not as simple as it seems at first glance. The following errors may occur:
- There is no "Mobile networks" item in the settings of the Android device. You need to look for other firmware versions, otherwise you will not be able to connect the modem.
- Not enough food. As an option - use with a fully charged battery, buy a better cable or USB-hub with external power.
Necessary equipment
Is it possible to connect a modem to the phone without buying additional equipment? Only if the device has a USB port. This is more typical for tablets. In other cases, you will have to purchase an adapter from USB to your phone's connector. And it should not be an ordinary cable, but an OTG so-called host adapter. It is designed specifically for external devices, and not just pairing a mobile phone with a computer.
You also need to purchase the USB modem itself, which consists of a communication module (3G or faster 4G) and a flash drive where the connection settings are recorded.
Modem setup
Before we tell you how to connect a USB modem to your phone, let's figure out how to configure the modem mode itself. If this is not done, then it will be recognized by the Android system simply as a carrier of information.
For Huawei and ZTE phones, the task is easier; special software has been developed for them. It is enough to run it and put the necessary checkmark. For all other phones, do the following:

The preliminary setup is completed, now let's move on to how to connect a modem to an Android 3G phone.
IMPORTANT. If you want to use the device on a computer, then the changed settings must be returned back. Repeat all the instructions, but enter the following command in the terminal: AT^U2DIAG=255.
Smartphone setup
After preliminary preparation, you can proceed to setting up your Android smartphone.

If all the points are completed successfully, then it was possible to connect the modem to the smartphone. However, mobile device manufacturers are not happy with the situation when, instead of buying a more expensive and modern gadget, a potential consumer finds how
Many smartphone users often need to access the Internet. However, it happens that the 3G module of the phone gives an error and does not allow you to use the global network. Also, many smartphones do not have 3G, but this does not mean at all that users of such devices are not able to access the Internet. The problem can be solved using a special modem that must be connected to the smartphone. Let's see how to do it.
Connecting a 3G modem to a smartphone
Connecting a 3G modem to the phone is quite simple. However, a caveat should be made that often the device can be defined as a flash drive.
In order for your smartphone to detect a 3G modem, you need to do the following, namely:
- Download the HyperTerminal utility.
- Install it on your computer.
- Find the device manager and find your modem among the installed devices.
- Right-click on the device name and go to the "Properties" menu.
- In this menu, you will find information about the port number and speed. They will need to be rewritten and then entered in the HyperTerminal utility.
- Run the utility and enter any connection name.
- Now you need to enter the data that you wrote down.
- After that, you will open a command prompt in which you will need to enter the command "AT1". The command line may not appear immediately, wait for it to appear. This may take about ten seconds.
- Next, click "OK" and enter the command "AT^U2DIAG=0".
- Wait for a response that the entered command is correct, click "OK" and turn off the modem.
- If your smartphone does not have a 3G module, download the PPP Widget application.
- Launch it and enter the mobile network details that are on the website of your mobile operator.
Now you can connect a 3G modem and use it to access the global network. As you can see, the task is much easier to solve than it might seem at first glance. And in order to learn more about how to set up the Internet on your phone, you should read these articles.
How to connect a modem to a computer?


A modem is an external device that connects to a computer, laptop or tablet via a USB port and serves to access the Internet. Access to the global network is carried out through a regular SIM card, which is inserted inside the device. Today we will look at how to connect a modem.
How to connect a USB modem to a computer
- Turn on the computer and wait for the operating system to fully load.
- Remove the cap from the modem and connect the device to the USB connector (there are models of the device with a retractable connector).
- After connecting, you need to wait a while for the computer to recognize the device and start the process of automatic software configuration.
- As soon as all the necessary work processes are over, the computer will notify you that a new device is connected.
- Then go to the "Start" menu, "Computer" section and select the "AutoRun" program. (Depending on the OS and brand of the modem, an autorun program dialog box may pop up. In this case, you must click on the "Run" button).
- Next, the program will prompt you to select the language in which the installation will take place. Click on the "Language Selection" item, click on "Russian" and then click on the "OK" button.
- Another window will pop up. You must click on "Next".
- Next, you will need to check the corresponding box, with which you confirm the license agreement.
- Click the "Accept" button to continue installing the program.
- Then you will need to select the location of the file. To do this, click the "Browse" button and select a folder to download the file. (By default, all downloaded programs are installed on the "C" drive in the "Program Files" folder. If you don't care where the program is installed, you can skip this step by clicking on the "Next" button).
- In the next step, you can optionally check the boxes "Place in the Start menu" and "Place a shortcut on the Desktop". This means that the program icon will be located both in the Start menu and as a shortcut on the desktop.
- Click on the "OK" button and wait for the installation to complete.
- When you receive a message that the installation of the program is complete, click the "Exit" button.
- Then the computer will automatically continue to install the necessary drivers.
How to set up a modem
The next step after connecting the device is setting up the device to access the Internet.
- Click on the installer shortcut found on your desktop. Or go to the program through the "Start" menu.
- Next, click the "Connect" button.
- An important step is to check the connection. To do this, enter the address of any site in the browser line. A fast page load means a good connection. But take note of the fact that in the evenings due to a large number network users speed may drop. Morning and night - the time of the "fast" Internet.
- At the end of the session, go to the program menu and click the "Disconnect" button, and only then disconnect the device from the computer.
- It is highly recommended not to change device settings.
The described technology for connecting and configuring the modem is universal for the device of any mobile operator.
If you have problems connecting or setting up the modem, read the instructions that came with the device. Or call technical support and describe the problem. you can find answers to a wide variety of questions about installing, connecting and configuring devices for accessing the Internet.
Almost everyone who connects to the Internet in the villages does it through 3G USB modems. Both in Ukraine and in Russia. This is because there is no way to connect regular cable Internet, and ADSL can not be connected everywhere (Besides, not everyone has a telephone line). Therefore, you have to use wireless 3G / 4G Internet. In Ukraine, the most popular provider is most likely Intertelecom. I use it myself from time to time. MegaFon, MTS, Beeline are very popular in Russia. But today is not about that.
No matter where you live and what kind of Internet you have, sooner or later you will most likely want to install at home wifi router. To distribute the Internet to all your devices: smartphones, tablets, laptops, etc. After all, when we use the Internet via a USB modem, the Internet can only be on one computer. But what to do with other devices, how to distribute 3G Internet from a modem to other devices via WiFi networks. We will now understand this, using the example of TP-LINK routers.
How to choose a TP-LINK router for 3G modem?
We will need a special Wi-Fi router that supports 3G/4G USB modems. Exactly special router, in our case we are considering TP-LINK devices. Since not every router can distribute the Internet from 3G modems. And even if you already have a TP-LINK router, it's not a fact that it supports modems, even if it has a USB connector.
People often ask how to connect a 3G modem to a TP-LINK TL-WR741ND, TL-WR841ND router, etc. No way, it simply does not support them. TP-LINK has several models that are suitable for working with modems from Intertelecom, MTS, MegaFon, and other operators. These are two ordinary routers: TL-MR3420 And TL-MR3220. And two portable ones: TL-MR3020, And TL-MR3040. Perhaps on this moment there are already other models. This means that our modem can be connected to these routers in a USB connector, and we will receive Internet via a Wi-Fi network, and network cable, for example, for a desktop computer. I have a TP-LINK TL-MR3220, I used to work with a Novatel U720 modem.
Very important point. If you have already bought a router, and just realized that it does not suit you, then it is not too late to return it back to the store.
And if you are going to buy, be sure to make sure that the router model you have chosen supports your 3G modem specifically. Yes, routers do not work with all modems. And it may turn out that the router simply does not see your USB modem.
To check compatibility, go to the official website. For Ukraine - http://www.tp-link.ua/ru/comp-list.html, for Russia - http://www.tp-linkru.com/comp-list.html in the section "List of compatible 3G/ 3.75G USB modems" click on the router model you need (which you want to buy), and save the .xlsx file to your computer. Open it and see what modems it supports.
I think everything is clear with the choice of the router. Let's now look at the process of connecting a 3G modem to TP-LINK. We will also configure the router to work with a modem and set up a Wi-Fi network. I'll show you on the example of my TP-LINK TL-MR3220.
Connecting and configuring a 3G USB modem on a TP-LINK router
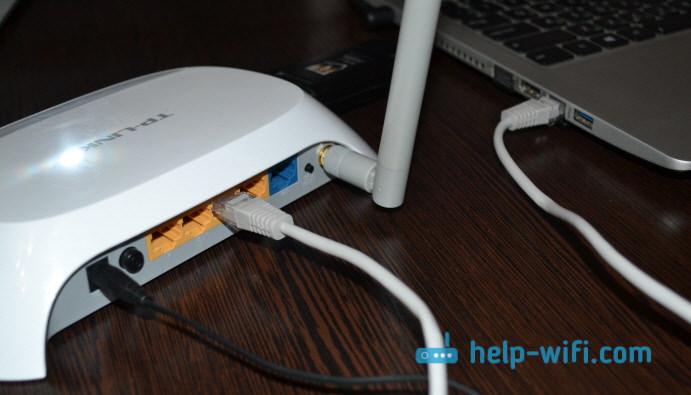
Nothing complicated. We connect the power to the router, and turn it on. We connect our 3G modem to the USB connector on the router (it is possible through an extension cord, if there is an antenna, then we connect it in the same way).
We need to connect to the router from a computer in order to enter its settings. Can be connected via cable (as shown below), or over a Wi-Fi network.
In the control panel, first open the tab network – Internet Access, highlight an item 3G/4G Only (Recommended), and press Save.

Next, open a tab. network – 3G/4G. Against 3G/4G USB Modem should be written Identified (or modem name). This means that the modem has been identified and is ready to go. If the router does not see the USB modem, then try updating the router firmware according to the instructions. There is a chance that after updating the software everything will work.
On the menu location choose our region (in my case Ukraine), and in the menu Mobile ISP choose a provider (I have Intertelecom). Further, connection mode we leave Connect Automatically, And Authentication Type exhibit Auto.
Click on the button Connect. The router must connect to the Internet through our modem. status should be connected. If that's the case for you, then that's great. We press the button Save to save the settings.
There is also a button advanced settings, if you click on it, the settings will open, where you can manually set all the parameters necessary for connection (dial number, username, password). But these settings are unlikely to be useful to you.

We have almost everything set up. If the router "makes friends" with the modem and connects to the Internet, then it already distributes it both via cable and via the Wi-Fi network. It remains only to configure the wireless network. Change your own name wireless network, and put a password on Wi-Fi.
Opening a tab Wireless, set a name for the Wi-Fi network, and set our region. Save your settings by clicking on Save.


Don't forget to save your settings by clicking on the button. Save. I would also advise changing the default password admin, which is used to enter the router settings. You can do this on the tab. System Tools – Password.
After that, reboot your router. This can also be done from the control panel. tab System Tools – Reboot, and click on the Reboot button.
The router will reboot. It should already automatically connect to the Internet via a 3G modem, and distribute the Internet via Wi-Fi and network cable. Connect to the Wi-Fi network using the password we set during the setup process.
Now, through one USB modem, we can connect several computers and other devices to the Internet. At the same time, the payment remains the same as before. But, if you have a tariff with limited traffic, then you need to understand that several devices will use the limited traffic faster. And very often, traffic that is over the limit is not cheap.
Possible problems and solutions
Unstable work, the Internet very often disappears
Wireless 3G Internet is of course not as stable as wired, and therefore, the modem may periodically lose connection with the base station. The Internet may disappear on those devices that are connected to the router. The computer will be "Without access to the Internet" (limited on Windows 10).
If the Internet is gone and does not appear, then just restart the router (turn off and turn on the power). Everything of course depends on your provider, and on the base station to which you connect. Intertelcom does this. Sometimes you have to reboot your router. And sometimes this does not help, you have to sit and wait until the Internet starts working.
After connecting the 3G modem to the router, it does not connect to the Internet
Very low speed the Internet
This is most likely due to a bad signal. In this case, we apply exactly the same advice as I gave above: we raise the modem, install the antenna, and set up the whole thing with the AxesstelPst EvDO BSNL 1.67 program.
Afterword
I tried in this article to give all necessary information, which will help you select and install a TP-LINK router that will connect to the Internet via a 3G modem and distribute it to all your devices.
This is a very relevant topic, as more and more providers provide completely unlimited tariffs, and all more people want to use the Internet via Wi-Fi on mobile devices, tablets, etc. And you can’t do without a router here. Although, there is one way, you can try to distribute the Internet from a laptop, here is a link to the instructions:.
If you have any questions on this topic, maybe I missed something, or something doesn’t work for you, then write in the comments. I'll be happy to answer and try to help.