How to draw Spiderman with a pencil step by step. How to Draw Spiderman How the Pros Draw Spiderman
This comic book character has been known for a very long time. Not a single generation of children has grown up on the exciting adventures of Spider-Man. This character was created by famous American writers Stephen Ditko and Stan Lee. Spider-Man first appeared on the pages of comics in 1962 and immediately gained immense popularity among readers. Many modern children, however, like their parents once, would dream of being in the place of this brave character, fighting evil and defeating it. Some kids give them a New Year's ball or wear T-shirts with his image, while others ask to draw Spider-Man, both in a classic way and in a modern one.
How to draw Spider-Man step by step with a pencil?
If we talk about the classic image of this hero, then his costume consists of boots and overalls, and the colors that can be seen are blue and red. It would seem that drawing a character from comics for your little one is not an easy task, but after studying our master class, you will understand that drawing Spider-Man in stages is as easy as, for example, a kitten.

How to draw the perfect Spider-Man?
It was an easy and classic version of the image of our hero. But time goes by and the character changes, so a master class on how to draw a new Spider-Man is presented below.

How to draw Black Spiderman?
Throughout his history, this hero has changed not a single costume. In one of the films, fighting evil, the clothes of this character change color and become gray-black. How to draw Spider-Man in a black suit, a master class will tell you. The principle of creating this drawing is the same as the previous one, so if you have mastered the previous method, then there will be no problems with the image.

Summing up, I would like to say that in order to draw any image, time and patience are required. Don't be discouraged if it doesn't come out perfect right away, as a rule, with each new attempt to draw Spider-Man, the drawing comes out better and better.
Articles on this topic:
|
The tiger is a majestic creature, and children are very fond of such animals - they are stately, beautiful and easy to remember by their original color. Therefore, it is worth figuring out how to draw these beauties for children. |
Is it easy to make a gift for mom with your own hands without going shopping? Just a small surprise is enough to surprise your loved one. We offer some ideas on how to please mommy on a holiday, or just like that. |
Hello everyone, today we decided to please the fans of the Marvel comic universe and draw a portrait of, probably, the most famous representative of this universe - Spider-Man. The lesson will be very simple, because we will draw Peter Parker, whose face is hidden under a spider mask.
In fact, this is a continuation of the portrait theme - after all, quite recently we painted a portrait, and for those who have completed that lesson, this one should not cause any difficulties. The main thing is not to get confused in the patterns and correctly convey all the forms.
By the way, we have already drawn a large number of Spider-Man's enemies (like, for example, and), and allies -, and others. We also did a lesson dedicated to ourselves, only then we drew his whole figure and in a dynamic pose. On our site, perhaps, a lesson dedicated to Peter, the red-haired Mary Jane, did not appear, but if you want to draw her, just leave a comment under this post. In the meantime, we begin our step by step drawing lesson dedicated to the portrait of Spider-Man!
Step 1
Let's draw the outline of the head. The head in the full face position, due to the narrowing towards the chin and the expansion in the region of the cranium, looks like an inverted egg in shape. But our today's character is located towards us not in a full-face position, but rather half-turned, so the contour of this stage will look asymmetrical.
Another feature is the slight downward tilt of the head, which also affects the shape of this step. Please note that in the left part of us there is an outline of the cheekbone formed by an obtuse angle, but on the right in this place there are no hints of an angle, a straight line passes there.

Step 2
Let's mark the silhouette of the head with a vertical line of facial symmetry, which will divide the face into two equal parts. Pay attention - it is significantly shifted to the side due to the fact that the head itself is turned. I will cross it with two horizontal lines, which will indicate the upper and lower edges of the eyes of the mask.

Step 3
On the lines outlined in the last step, draw the eyes. In the lower part they are rounded, the upper part bends only slightly. The corner of the eye, which is located near the temple, is acute, and the one located at the bridge of the nose is obtuse. Please note that in the temple area, the black-shaded part of the eye is much more voluminous than at the nose.
By the way, the fantasy of the writers and artists of Marvel created two more characters with eyes of a very similar shape - we are talking about terrible monsters and they are one of the main enemies of our hero.

Step 4
We turn around the resulting drawing and outline the lines of the shoulders. Nice mask design, right? He liked it so much that this mercenary made his own costume very similar to the costume of our hero. Especially in terms of mask design.

Step 5
Let's start drawing a pattern on the Spider-Man mask. From the area just above the bridge of the nose, we will direct smooth, smooth, thin lines that will diverge throughout the mask, moving on to the suit. Please note that as you move away from the bridge of the nose, the lines should expand. An important point is that exactly five lines fit between the eyes both above and below. By the way, the lines in the forehead area should be bent - along the contours it is slightly similar to combed back hair.

Step 6
Now let's draw the transverse part of the pattern. It is this part that makes the pattern look like a real web - each resulting segment should bend in the center. Pay attention - in the lower part, from the nose to the chin, 6 such horizontal lines are obtained, and if you go from the nose to the back of the head, you will see 7 lines of the horizontal pattern.
An important point is that the intensity of the arrangement of the lines increases as it approaches the nose, that is, the farther from the bridge of the nose, the greater the distance between the horizontal lines. If everything was done correctly in the previous step, then in this we will get a beautiful pattern that expands as we move away from the bridge of the nose.

Step 7
Outline the contours of the face and shoulders of our Spider-Man. Let's apply a small area of shadow with a soft.
So we have finished a step-by-step drawing lesson dedicated to how draw spider man. Be with us on the pages of the site drawing for all.
Spiderman is a fairy tale character and superhero loved by children. He often appears in various comics published by Stan Lee and Steve Ditko.
On the pages of their magazine, they published interesting stories of a teenage character who was an orphan.
He was raised by his uncle and aunt. He combined his studies and at the same time fought crime.
Spider-Man has super strength, increased agility, and spider-sense. He knows how to confidently hold on to various sheer surfaces, let go of the web from his hands.
The young man became the creator of a unique invention that helped him fight criminals.
For inspiration, you can look at already drawn pictures or draw Spider-Man yourself.
They will help to consider in more detail all the details in order to depict them on a piece of paper.
There is an original version of the creators who claim that the teenage orphan is called Peter Parker.
Together with his uncle and aunt, he lives in the big city of Forest Hills, New York. Peter is a good student, so he is often mocked by his peers.
They gave him the offensive nickname "bookworm". Man became a spider for a reason. During a scientific exhibition, a young man was bitten by a real radioactive spider.

It was thanks to him that the guy had incredible abilities and super strength.
He can shoot cobwebs and quickly move along the walls, roofs of multi-storey skyscrapers. Peter hides his real face through a suit and mask.
Drawn original pictures can be found in comics, use the photo selection.
Pencil Drawing: Spider-Man Homecoming
A few years ago, a film called Spider-Man: Homecoming appeared at the box office.
All the fans were looking forward to it. The main role went to the young actor Tom Holland.
Note! People who watched the movie noticed that Peter Parker had two suits.
He got the first one as a gift from Tony Stark. The second one he did himself. Both costumes are worthy of attention.
First, the picture is drawn with a simple pencil, and then bright colors are added.
The greatest difficulty lies in drawing the costume, because it is covered with a web pattern. You can watch a video tutorial to make it easier.

There is a phased technology that is suitable for children and adults:
| Stage | Detailed description |
| Drawing the contours of the body and head | The contours of the torso, legs, head, arms are applied to the paper. It is important to observe the exact proportions. The initial contours are an important stage on which the final drawing depends. If difficulties arise at this stage, you can print a ready-made outline |
| body outline | Simple and easy step. The outline of the body should not be too small or large. It is important to pay special attention to the arms and legs. Their contours should be the same. Missing proportions immediately catch the eye |
| Removing the original contours | After drawing the shape of the body, you need to remove the extra contours. It is important to check the proportions again, if necessary, make corrections with a pencil |
| Adding small details and elements | The eyes are carefully hidden under the mask, so you need to mark their places with cutouts in the form of triangles. The cartoon character has no shoes. At this stage, it is important to draw bulging places to indicate the pectoral muscles. Additionally, the dividing lines of the sleeves of the brushes and the suit are indicated |
| costume drawing | Next, you need to draw a costume. The image must display the web grid. It needs to be transferred to the image. In the comics, on the main character's costume, the mesh is located on the head, arms and chest. Partially it is presented on the lower part of the leg. The rest of the costume can be painted over in one color or shaded with a pencil. |
The drawing of Spider-Man is almost ready. At the last stage, you can paint over the costume with multi-colored pencils. You can also mark the shadows with a simple pencil.
Note! A bright picture looks more interesting and attractive.
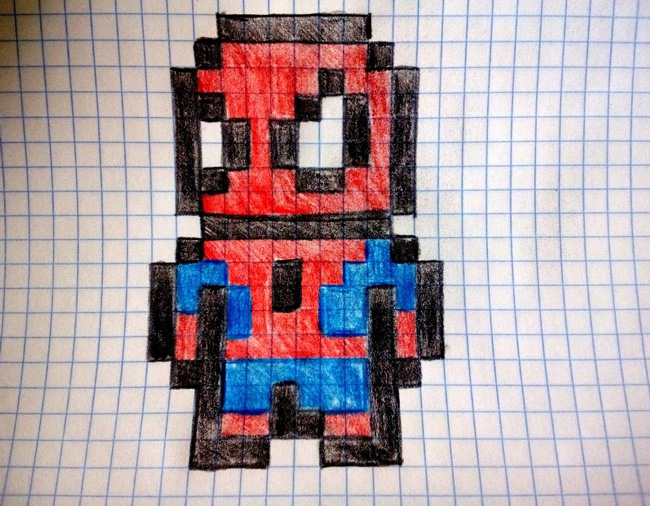
Sketches for children by cells
Drawing Spider-Man in the cells will come in handy before school. Parents should pay attention to this method of development.
Thanks to proper and comprehensive preparation, it is easier for children to adapt to new conditions.
Drawing by cells or graphic dictations are needed at the age of 5-10 years. Parents will be able to gradually prepare the child for school, turn classes into an exciting process.
The following advantages can be distinguished:
- The development of spelling vigilance.
- Help with perseverance.
- Improving memory and attention.
- Development of spatial imagination.
Important! In children, fine motor skills of the fingers are involved, coordination of movements is improved.
To draw Spider-Man, you need to put a sample of a new graphic picture in front of the child.
Drawing helps to understand the technology so that it is easier for the child to understand. It is important to repeat and reproduce it exactly. The child is given a notebook in a cage.
At an older age, you can dictate the sequence of actions to the child. Be sure to indicate the number of cells, their direction and shade.
Work is done by ear. It is important to check the child, compare his drawing with the initial version, analyze the correspondence of the ornament or figure.
How to draw a spider man mask for a child
Every boy wants to feel like a cartoon character. To draw a mask, you can use a ready-made paper template or draw it yourself. You can involve your child in the process.

You need to take a template in black and white, and stick it on a cardboard base to strengthen it. The child can independently paint the mask in red.
Places for the eyes are cut out with a clerical knife. If you do not use a template, you need to draw an oval of the face, cut it out and make a cobweb mesh over the entire face.
Be sure to leave room for large triangular eyes.
Useful video
Spider-Man is a well-known character from comics, animated series and films. This brave hero is liked not only by children, but also by adults. Perhaps, it is for this reason that the question of how to draw a spider-man remains relevant for so many people.
Before you draw a spider-man, you need to prepare:
one). multi-colored pencils;
2). Eraser gum;
3). Pencil;
four). Liner;
5). paper.
It will be easier to understand how to draw a spider-man with a pencil if this whole process is divided into separate steps:
1. First, outline the hero's head in the form of a square. On the sides sketch out the hands;

2. Draw the torso and legs of the character. Since he is depicted in a jump, his legs should be bent;

3. Draw the hero's head. She is in profile, so only one eye should be visible. Please note that the eyes of a spider man have a peculiar, somewhat elongated shape and rather large sizes;

4. Draw the hero's hands. Depict a stream of cobwebs coming out of the spider-man's hand;

5. Draw the hero's legs more clearly;

6. Draw a costume. To make the spider-man drawn in stages look realistic, be sure to draw a characteristic web pattern on his head, arms, legs and chest. Remember that a spider should be drawn on the hero's chest;

7. To make the sketch look complete, be sure to draw a background that is typical for this character, for example, multi-storey buildings. Thanks to his extraordinary abilities and web, Spider-Man can easily move along walls and between buildings;

8. Now you know how to draw Spiderman step by step with a pencil. In order to colorize the image, it is first worth circling it with a liner;

9. Erase the pencil sketch with an eraser;

10. Color the spider-man in yellow, and in red those details of his costume where the web is depicted;

11. With a blue pencil, color the rest of the costume. Shade the sky with a pale blue pencil, and shade the houses with gray. With a light gray pencil, paint over the web that the hero throws out.

The Spiderman drawing is now complete! You can make it more vivid by coloring the image with paints. Or, on the contrary, you can make it more gloomy and graphic if you use a black marker instead of paints and pencils. In any case, knowing how to draw a spider-man in stages, you can create a very interesting and memorable picture on your own.

Practice drawing and coloring contour drawings It is advisable to start at an early age. And you can even invite to the world of coloring three year old baby . The main thing is to teach the baby how to properly hold a pencil in his hand. Many articles on the site are devoted to teaching children how to draw certain objects ( ships, tanks, planes ), as well as for boys and girls. If at 3-4 years old the child can paint on your own the simplest contour pictures, consisting of 1-2 parts, then for older children (5-10 years old) it is advisable to choose coloring pages of a certain theme.
For girls, we have placed contour images of popular cartoon characters - little ponies, monster high, winx fairies, disney princesses . And for boys, you can download or immediately print on paper. free coloring pages with the image of cars from the cartoon "Cars", racing cars, trains, various military equipment.
And this article is dedicated to the legendary comic book hero - Spider-Man or Spiderman. We will teach you how to draw Spiderman step by step. In addition, you can print high-quality outline pictures dedicated to Spiderman for the boy (see 12 coloring options at the end of the article).
Do you still not know who this Spider-Man is? For the first time, the image of this superhero was presented on the pages of American comics. Amazing feats, unique superpowers and a stunningly original red and blue suit have won the hearts of many boys around the world. And soon Spiderman from the pages of comics hit television screens, video games, science fiction films and cartoons, as well as shop windows with children's toys. Not surprisingly, the Spiderman toy is still popular in children's games, and Spiderman coloring pages are still the most in demand among boys compared to other superheroes.
How did the famous superhero Spider-Man come about? Once a modest but gifted in science boy, an orphan named Peter Parker, was bitten by a radioactive spider. Peter soon begins to realize that something strange is happening to him. The boy develops phenomenal jumping ability, as well as the ability to move along walls and other vertical surfaces. He realized that the amazing super-strength came from the bite of a spider. Soon the talented boy creates an original "spider suit". In the wrist area, the suit is equipped with a special device that shoots a sticky substance that turns into a web. Peter Parker turns from an ordinary boy, who was often offended by his peers, into a real superhero who declared an uncompromising war on villains and criminals...
How to draw spider man step by step:
Our task is to take a simple pencil and try to convey in the drawing the flexibility, dynamism of Spiderman, and also, using a certain arrangement of lines, depict a rather complex character costume.

Stage #1:
Draw the contours of the character's body in a certain order.
Carefully redraw the schematic arrangement of lines from picture No. 1. Maintain the proportions of the contours of the head, torso, legs and arms as accurately as possible so that the image of Spider-Man looks believable at the last stage of drawing.
Stage #2:
Draw the outlines of the body around the contours.
Carefully outline the contours, looking at picture number 2. Make sure that the line does not go too close or vice versa - too far from the contours, so that our character does not end up very thin or fat. Do not forget to keep the proportions - the different thickness of the paired elements of the picture (arms, legs) immediately catches the eye.
Stage #3:
Delete extra lines.
All contour lines drawn in the first stage must be carefully erased with an eraser. After that, once again carefully look at the proportions of the drawing - if there are errors, erase the problem areas of the outer contour and now draw correctly with a pencil.
Stage #4:
Internal detail of the drawing.
We look at the picture of this stage and accurately redraw the following elements - a slit for the eyes on the mask, dividing lines of the costume, pectoral muscles.
Stage #5:
Spiderman costume.
Now we need to very carefully draw the vertical lines of the web grid, and then the small undulating horizontal lines between them. We draw a web in the head, chest, arms and boots of Spiderman. Drawing of spider man for coloring is ready!
How to draw a Spiderman mask step by step:

PRINT FOR COLORING PICTURES FROM THE SERIES "SPIDER-MAN"

Press the right mouse button and select from the list: Copy (Copy) or Print (Print).
OPTION #1: