Connecting your PC to the Internet via cable. Difference between dynamic and static IP addresses. How to properly connect wired Internet to a laptop
Everyone Have a good mood! In this publication we will talk about how set up internet on your computer via cable. Moreover, friends, once upon a time, this topic was already discussed on this blog.
But since a lot of water has passed under the bridge since then, and Windows 10 is widely used on new computers, a urgency update info. Although, to be honest, nothing much has changed in this matter.
So, since unlimited technology is advancing by leaps and bounds across the expanses of our vast homeland, within the framework of this publication we will consider connecting via a modem that is configured in router mode.
Therefore, if someone else does not know where to plug in the network cable correctly or why you need the login and password that you were given at the subscriber point, be sure to read the following material:
After the computer is connected to a properly configured modem using a cable, there is little work left to do. You just need to configure the network card. This is done very simply, there will be no problems.
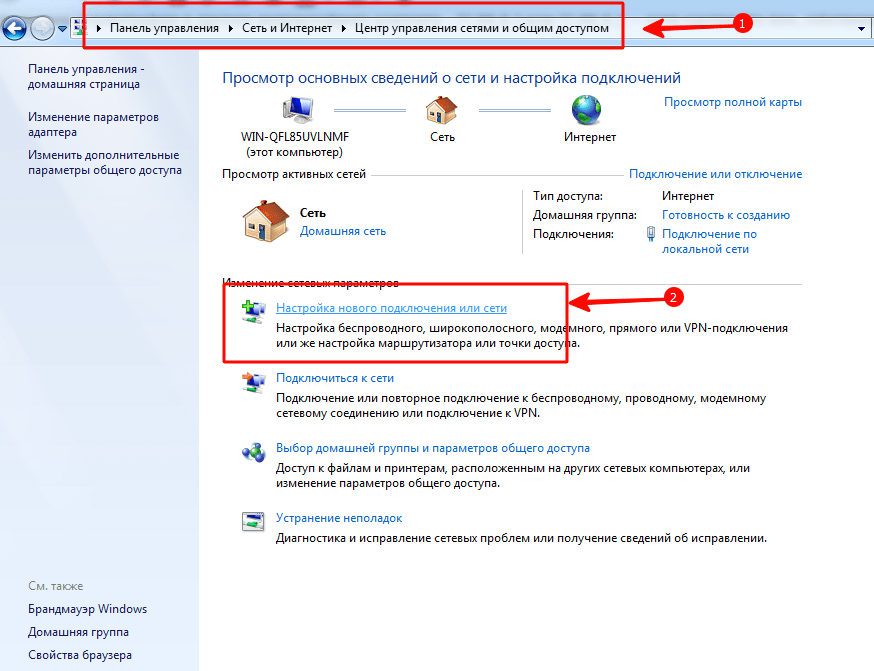
In the future, everything will be shown using Win 10 as an example, although in previous versions of this operating system everything is done by analogy. So, let's get started. Right-click on the “Start” button, and then select the “Network Connections” section:

A window will open in which you need to select wired connection, after all, we connect via cable. It is usually called “Ethernet” or “Local Area Connection”:

Now right-click on it again and go to “Properties”. At the next stage, you need to select “IP version 4” and click the “Properties” button at the bottom:


- IP Address: When using dynamic IP, this is any value in the range from 192.168.1.2 to 192.168.1.254. If you have a permanent IP address, you should specify it;
- Subnet mask: determined automatically, do not touch anything;
- Default gateway: you should specify the IP address of the modem, which distributes the Internet to the computer via a cable.
After that, go to the item “Use the following DNS server addresses.” Here you need to specify the values that are recommended. If you don’t know them, you can use universal ones. Here they are:

At this point, it is important to understand the fact that it is thanks to these addresses that sites open in the computer browser. Therefore, they can be used to block certain resources. Look at the third row of the table above.
In short, after all the manipulations, click the “OK” button and begin to enjoy the Internet. If suddenly the sites still do not load, then it is strongly recommended to check the settings again, and then study this article:
And with this, the article on how to set up the Internet on a computer via cable has come to an end. If you have questions, be sure to ask them in the comments. And at the end look interesting video about Russian people on the Internet.
So, you have finally concluded an agreement with a new provider, and a cable with a plug has been installed in your apartment - a real window to the world. All you have to do is connect it to your computer - and the Internet is at your service. However, if it was enough to insert the plug into the socket, you would not need to read this article.
Let's look at how to connect the Internet to a computer via cable, in the very simple case. Let's say you have only one computer, and you will use it as a router (if you suddenly need it or a tablet). Or (alternatively) you are planning to do so later, so you turn off the router to make remote access easier.
Let's say you have a network card on your computer (it doesn't matter whether it's separate or built into the motherboard), and you've just connected an Ethernet cable to its input. We assume that you are using the most current Windows 10. Although for the correct settings of Windows 8/8.1 or even 7, these instructions are also suitable: the principle is the same.
Of course, you can always call a specialist to do everything the right job for you. But specialists are not always free. In addition, you will not only save money on calls on your own, but also learn how to set up the Internet on your computer via cable. In our world, such knowledge can come in handy at any time.
Dynamics vs. Statics
Now check with your provider what kind of connection they offer on your tariff plan: dynamic or static.
With dynamic connection your IP address may change depending on your ISP settings (and if you intend to subsequently connect to your workplace remotely, this may interfere with you). But manipulations with entering parameters are reduced to a minimum: the provider sets the IP address, subnet mask and default gateway independently. In this case, just insert the cable into the computer and that’s it, you will have access to the Internet.
Static connection provides a static IP address assigned to your computer (or router, if you choose to connect through one). In this case, you will have to manually enter the IP address, subnet mask and default gateway in the connection settings. Usually all these incomprehensible numbers and letters are included in the access agreement or in an appendix to it. If necessary, you can clarify them with the technical support service by providing your details.
In some cases, access also requires a login and password (do not confuse Internet access as such with access to your personal account on the provider’s website - for personal account data is required).
How is the connection made?
Let's look at the procedure step by step.
- Insert the plug of the Ethernet cable brought into the apartment into the corresponding port of the computer. Even if you have never done this before, you will not be able to confuse this type of connector and plug with something else.

- Right-click on the “Start” button and find the “Control Panel - Network and Internet - Network and Sharing Center” section. In the left column, select the “change adapter settings” tab. A list of your adapters will appear in the main window (more precisely, in our case, one “Local Area Connection” adapter). Again, use the signature “right-click” technique and select “Properties”.

- A small pop-up window contains a whole column of different strings with properties. Select the line “IP version 4 (TCP/IPv4)”. While it's selected, click the Properties button below the list box.

Now our instructions branch out. Have you checked with your provider what IP is provided to you? If not, check now.
- If dynamic, then trust the automatic selection in the IP address and DNS server settings.
- If it is static, you will have to enter the values manually. As a rule, you need to specify “IP address”, “Subnet mask”, “Default gateway” and “DNS server”. When you have completed entering your data, click OK to save your selection.
Important points:
- If the connection requires a modem, enter its default address as the IP address; this is usually 192.168.1.1. If the modem has a different IP (which is rare), it is indicated on the bottom of the modem itself or in its instructions.
- Usually the ISP provides the DNS server details, but sometimes this is omitted. Then you can use the universal ones:
1) Public DNS from Google: 8.8.8.8 or 8.8.4.4 - a universal solution, usually suitable for all computers
2) OpenDNS – 208.67.220.220 and 208.67.222.222
3) Yandex DNS with its own anti-virus filter - 77.88.88.88 or 77.88.8.2 - if you trust the Yandex anti-virus policy (although sometimes it may consider a completely decent site unreliable)
4) Yandex DNS with a filter for pornography and other obscene content - 77.88.8.7 or 77.88.8.3 - although it depends on what you actually need from the Internet, hehe.
- Let us repeat: if remote access is important to you, make sure that your provider’s support ensures that your IP will not change.
If your ISP offers L2TP access, this may require some additional steps on your part. Usually the provider provides instructions for setting up this specific type of connection, but it wouldn’t hurt to duplicate it on our part either.
So, to configure L2TP, you need:
- Go to the already known section “Network and Sharing Center” and select creating a new connection
- Unlike previous options, here you should go to “Connect to your workplace”
- When the system prompts you to create a new connection, select this item
- Select "Use my connection"
- Enter the server address provided by your provider. You should not select the immediate connection option. You can assign a name that you like.
- IN next window Enter the username and password provided to you. Don't forget to check the box next to "Remember password"
- Connect now when the system prompts you to do so
- Return to “Adapter Properties” (as discussed above) and select the “Security” section
- In the VPN Type drop-down options, select L2TP IPsec VPN. Below is the line “Data Encryption”, here you need to select “Optional”
- Under the "VPN Type" line, click the "Advanced Options" button
- Enter this same key in the “Key” field. You must have it from your provider.
- That’s it, you can click “OK” with peace of mind and use the connection.
This instruction works for Windows 7 and newer versions.
Why all this complexity? - you ask. This solution has advantages: for you - increased connection security (compared to a regular LAN), for the provider - simplification of the billing system.
Setting up PPPoE
Before setting up the Internet on your computer, check with your provider about the type of access it offers. Access via PPPoE requires not only correct settings, but also authorization using a login and password. You will need this connection method if you do not use a modem or router, but insert the cable from the provider directly into the connector on the computer, without intermediaries.
To do this, you again go to the “Network Control Center” and select there and use it to create a new connection.
In the wizard that launches, you select the first item - “Connect to the Internet” - and click “Next”. Then in the window that appears, you must select “High Speed (with PPPoE)”.
The final step remains. In the final window, you need to come up with a name for the connection and enter the login and password issued by the provider. If your computer is used by several people (for example, family members), each under their own account, and you want to give them all access, then check the box “Allow other accounts to use this connection.”
Now make sure your Internet connection is working. And if so, then hello world!
A laptop is often used as a home computer, as a result of which the problem of access to inexpensive Internet, which also has high speed, is relevant for it. These qualities today are more closely matched by an Ethernet connection, so below we will tell you how to make correct settings Internet on a laptop.
Ways to connect a laptop to the Internet
There are several ways to connect your laptop to wired Internet:
- via a USB modem, which is convenient, for example, in the country, but such a connection often does not provide sufficient speed and usually costs more;
- using Wi-Fi if there is an access point, for example, when a Wi-Fi router can be connected to a desktop computer with the Internet;
- This can be done via a wired Ethernet network, which provides the highest speed, connection to which will be discussed later.
Cable Internet for a laptop is the fastest, but also the most inconvenient, since in fact it can make mobile computer stationary. At the dacha, for example, it is better to turn on a simple USB modem. A Wi-Fi router is very useful for use in an apartment.
Preparing for cable internet connection
To set up an Ethernet connection, first connect the network cable to your laptop. You can also connect a router to it, which, after configuration, will be able to distribute Wi-Fi to any other devices, providing fairly decent speed.
The twisted pair wire is laid from the switch in the entrance to the place where you plan to make an access point to the Network. Using a special tool, a plug with an RJ-45 connector is mounted on the cable, which must be plugged into the corresponding socket on the panel on the side of your laptop.
Connecting to the Network will not be possible without the necessary drivers for the network card. To check that they are installed correctly, do the following:
- Windows XP. Go to the control panel by clicking “Start”, select the network connections section.
- For Windows 7 and older versions. Go from the control window to the network and sharing settings section, then select the option to change settings for the adapter.
If the window that opens is empty, the driver is probably not installed.
General rules for connecting high-speed Internet
The data required for connection is specified in a special agreement. If you want to turn on the router, you will need to make other settings described in the specifications for the device. If automatic network detection does not occur, you will have to configure the TCP/IP protocol yourself.
In Windows 7 and 8, the connection is made in the following order:

In Windows 10, the connection is made as follows:
- From the Settings section of the Start menu, go to Network and Internet.
- Next, you will need to open the adapter settings settings.
- Next, follow all steps, starting from step 3, described for Windows 7 and 8 systems.
No further actions are required - the connection should work as soon as possible. full speed automatically. If you are connecting via a router, the procedure may vary for different providers, so to set up the Internet, first find out full information on the corporate website of the provider providing this service.
Alternative Internet for a summer residence
Note that in a country house where it is not possible to connect to the Internet via cable, the best choice would be to use a USB modem. As a rule, there are no problems with its connection:
- Insert a SIM card into the modem, then connect the device to the laptop;
- The system will detect a new device and offer to install a program that allows you to use a modem on your device;
- You may then have to enter the PIN code indicated on the card, after which the modem will automatically connect the laptop to the Internet.
In a word, you can connect to the Internet, which would have high speed even in the country, through a cable or router, and the procedure for setting up the connection can sometimes differ slightly.
Again I want to try to answer Daniel.
Daniel, I have installed the “N Series Multifunctional Wireless Router” TP-LINK TL-WR842N.
I purchased and installed it when I was tired of “fiddling” with wires that were constantly getting in the way under my feet and not only for that reason.
Long before buying a router, I bought three “Wireless USB Network Adapters” TL-WN823N for my three desktop computers
and distributed WI-FI internet from your “main” (most powerful) computer, to which a high-speed Internet cable was connected. All traffic went through my computer, which entailed inconvenience - when I turned off my computer, I cut off Internet access to other family members and the load on my processor was noticeable.
By purchasing a router, I received a device that provides all my devices (personal devices, laptop, tablet and two smartphones) with equal and balanced speed access to the Internet.
Following the router's Quick Setup Guide, I created my own wireless network, with your password (not to be confused with the password for accessing a high-speed wired connection).
It is important here that the router connects to the Internet automatically, which is indicated by green lights. If the large light bulb (LED) glows green, it means the router has connected to the Internet and is ready to distribute the Internet; if it lights up yellow, then something is wrong with the connection to the Internet provider via cable (perhaps it is not configured correctly).
Connecting to the Wi-Fi network we created is the same for both a laptop and a phone - look at the list of available wireless connections, select the network with the name that we entered when setting up the router, and click “connect.” When you connect for the first time, the system will require you to enter a password - enter the password, again, the password that we “hammered” into the router during setup (but this is not the password from high speed connection, you can forget that password, the router will always remember it).
Now about what all the fuss is about. As I understand, you decided to connect your computer to the router using a wire, and other devices using Wi-Fi. I didn’t try it, but immediately hung the router in the far corner and haven’t touched it since. I don’t remember why I didn’t try the way you are trying to connect, or maybe I even tried, but I can assume that it won’t work just like that, “from a running start.” Recently I read articles on the Internet, looking for an answer to the question of how to expand the Wi-Fi coverage area. So - it's not that simple. It is necessary to organize several networks and hierarchical dependence of devices (the required number of routers).
From the description of the TP-LINK router it does not at all follow that those four yellow connectors are an analogue of a HUB, designed to connect several computers to the Internet as if they were part of a Wi-Fi network, and they are not repeaters or branchers of the wired Internet. It's still called a wireless router.....
I managed to find a description of the router on the Internet in Russian and with pictures:
img.mvideo.ru/ins/50041572.pdf
Perhaps you will be able to learn something and I would be grateful if you later share the solution you found (if you find it).
But I wouldn’t suffer for a long time and would buy a USB Wi-Fi adapter….