Technology for installing open electrical wiring in a wooden house. Electrical wiring in a wooden house: step-by-step instructions, nuances and some features. Selecting the wiring type
Electrical power is necessary for the full operation of a modern one. With the right approach, you will create good and not too expensive electrical wiring yourself. The step-by-step instructions explain only part of the actions. In addition, it is necessary to study the current profile standards, new technologies, and components. Knowledge about checking the system and current prices for specialized services of specialists will be useful. This and other useful information is presented in our review today.
Read in the article
Proper electrical wiring in a wooden house: basic definitions

The environmental friendliness of the main materials is an absolute advantage. Therefore, owners try to use them as often as possible when creating functional and decorative parts of the structure. It is natural to want to minimize the use of chemical impregnations.
The presence of flammable materials determines the first requirement for good electrics in a wooden house - it must comply with fire safety rules.
Other important details are listed below:
- If so, the surfaces will be uneven.
- Under the influence of temperature, wooden buildings are deformed.
- The material itself is a good dielectric, but it can absorb moisture.
Separately, it is necessary to note the current requirements for electronics. wiring in a wooden house. They are based on the increased energy needs of modern users. The total power of typical household appliances is quite large, so in some situations standard single-phase 220 V electrical wiring is not enough. Its installation is carried out with a total load of less than 15 kW.
Electrical wiring in a wooden house is carried out at a distance of at least 50 cm from low-current networks: computer, transmission of audio and video signals. This will prevent noise interference.
Features of installation and operation of electrical wiring in a log house


These devices are more expensive than their outdated counterparts. But they can be used repeatedly. They protect connected installations and electrical circuits from damage in the event of overloads or short circuits.
Select suitable products taking into account several factors:
- In the accompanying documentation, the manufacturer indicates the current (nominal value) at which long-term preservation of the integrity of the electrical circuit is ensured.
- The shutdown response time and the threshold for exceeding the current amplitude are also given.
- Electrical parameters change very quickly when connecting other inductive loads.

Outwardly, they are similar to ordinary circuit breakers. But they act differently:
- The RCD (1) is connected to the circuit with conductors 2 and 3 (phase and zero, respectively) with a powerful load.
- Here is an example with (6). Its body is connected to ground (7).
- In operating condition, the currents in both circuits (4 and 5) are the same.
- If the insulation is broken, the balance will change. This is the control signal for the protective device, which turns off the power.
Related article:
The device, operating principle, labeling, main selection criteria, review of well-known manufacturers and brands, device connection options - you will learn about this and much more from our material.
For your information! You can figure out how to properly install electrical wiring in a wooden house on your own. But some operations come with additional challenges. In the group of protective measures, specialists should be entrusted with calculating the parameters of protective circuit breakers. These devices should fully perform their basic functions, and not turn off the power every time you use the coffee grinder.
Preliminary preparation for installing wiring in a wooden house with your own hands: diagrams and other components of project documentation

You can make a similar electrical circuit in a wooden house with your own hands based on the existing design documentation. When working from individual rooms, the exact locations of two groups of devices are established: and. Each of them is connected to the power supply separately. The following advice from experienced specialists will also be useful:
- The plan shows the installation locations of the products taking into account current standards. However, some rules can be broken. To reduce the strain on your back during cleaning, the connection sockets are raised to a level convenient for users (80-110 cm from the level of the finished floor covering).
- A separate power supply line is laid to the water heater and other powerful consumers. It is calculated specifically taking into account real loads, and is protected using the methods discussed above.
- The figure shows an example of electrical wiring in a wooden house. In reality, you need to carefully consider your own needs. In relation to sockets, you need to remember a simple practical recommendation: “Install them with a reserve.” One device must be installed for every 5-7 m of the perimeter of the room. The number is increased in places where computer, audio and video equipment will be subsequently installed.
- When equipping closets and other rooms without natural light, switches are mounted outside.
- In all places they are installed at a height convenient for users, not far from. Make appropriate adjustments when installing devices near stationary sofas and armchairs. This paragraph explains the need to use layouts with the location of furniture marked.

Its use allows control from three places. Similar solutions are used when equipping long corridors and large rooms.


This device is made in a non-standard design. They are not suitable for installation in standard mounting boxes.

The examples given confirm the importance of a thorough preliminary check of all components of the power supply system and consumers connected to it.
| Product | Power, W |
| Computer | 350-800 |
| Plasma panel | 450-650 |
| Modern TV (OLED, LCD) | 100-200 |
| Refrigerator (chest freezer) | 120-550 |
| 1000-2500 | |
| 900-3200 | |
| Oil heat fan | 800-2500 |
| 350-2300 | |
| Domestic boiler | 1100-2500 |
| 1200-4500 |
Such a table must be compiled taking into account real technical data. In typical calculations, professionals take the sum of all capacities and multiply it by 0.15-0.25. This correction factor represents real needs since the equipment is not connected to the network at the same time.

The figures marked in the figure are taken from the current rules. But, as emphasized above, a “creative” approach can and should be used. Individual corrections should not create additional difficulties. To do this, you should remember the basic principles of constructing all electrical networks:
- high level of security;
- providing end consumers with sufficient energy;
- no interference with other systems.
The following recommendations will help you make high-quality electrical wiring in a wooden house:
- When laying routes, strictly horizontal and vertical lines are used. This allows only the external parts (sockets, switches) to make a correct conclusion about the placement of hidden elements (cables, wires).
- and special external channels provide good access to electrical wiring networks in a wooden house for checking and troubleshooting.
- Routes hidden inside non-demountable building structures must be photographed. These pictures will be useful later for safe installation, repair and modification of electrical wiring.

You can do the preparatory steps yourself. Moreover, this is necessary for accurate accounting of individual needs and error-free preparation of technical specifications. However, there are strong arguments in favor of entrusting the preparation of a package of project documentation to specialized professionals:
- This work is performed using specialized software, quickly and without unnecessary financial costs.
- Specialists create a project in accordance with the current “Rules for the Construction of Electrical Installations” and other regulations.
- Errors will be eliminated at the documentation creation stage.
- A professional project is easier to coordinate at all levels.
- It contains a complete list of components.
- With the integrated use of appropriate services, the designer supervises the practical implementation of the electrical wiring project in a wooden house.
Separately, it should be noted the benefits of qualified information support when choosing cables, switches, and other system components.
Methods for laying wiring in a wooden house
The creation of a high-quality power supply system in such a facility is based on a thorough study of safety issues. Statistics confirm that it is the incorrect installation of electrical wiring in wooden houses that often becomes the cause. Emergency situations create various types of insulation damage. It can be damaged by mechanical stress and high temperature. It is necessary to plan routes accordingly in order to eliminate negative factors.
In particular, we must not forget about the deformations of wooden buildings. Log houses are protected from bad weather for one season. Only after a year are the window and door frames installed. Even after such preparation, special technological gaps with a soft seal are left to compensate for possible changes in size. Of course, similar precautions should be applied to other parts of the structure and engineering structures.
It is easier to ensure a good result when installing electrical wiring in a wooden house from high-quality. Excess moisture is removed from such materials during special technological operations. They are protected from rotting and water penetration. Manufacturers provide official installation instructions. Some offer turnkey construction with appropriate guarantees. Below we talk about how to create power supply routes with your own hands without errors.
How to install hidden wiring in a wooden house
A wide range of products in this category creates a false impression that there are no problems when installing hidden wiring in a log house. Conductors are created from several twisted wires, which increases reliability and resistance to bending. Multilayer shells provide excellent insulation properties. Polymers reduce electrical conductivity and prevent moisture penetration. Armoring is created from steel strips, which protects against mechanical damage.

After a detailed study, you can find out that the most reliable products are expensive. It is economically inexpedient and pointless to equip a wooden residential building as a bunker for a bomb shelter. To reduce costs, choose a cable at an affordable price and hide it under decorative lining made of clapboard. In some cases, internal wiring in a wooden house is done using mounting boxes.
All of the above methods are incorrect. In accordance with the PUE rules, hidden wiring in a house made of such materials is laid in a metal pipe. Only such a shell will provide sufficiently good protection.
For your information! Wide plastic channels create paths for rodents to move comfortably. Some harmful animals can damage the insulation of conductors.
It is convenient to work with copper pipes. They have relatively low weight with high strength and durability. It is not difficult to bend them without damage, to connect them into a single electrical wiring route in a wooden house. But the wall thickness is not standardized only for conductor cross-sections up to 2.5 mm. sq. If powerful consumers are connected, you will have to use the appropriate products.


Internal wiring can be done inside, creating a protective layer of 1 cm or more on all sides of the route. However, the practical implementation of such plans is questionable. Natural deformations of wood will quickly destroy the hardened mortar.
Methods for installing open wiring in a wooden house
This technique does not involve placing lines inside combustible structures, so there are fewer restrictions.

PVC pipes look aesthetically pleasing. To install the route, you can use specialized ones with nozzles of the required sizes. This technology helps to quickly create reliable and tight connections. Standard mounting clips will come in handy.
This option has the following details:
- It is not too difficult to choose products with a color suitable for a particular interior.
- The lower part of the electrical wiring channel in a wooden house is quickly secured using screws. In standard kits, manufacturers offer corners, tees and other parts for creating channels with complex configurations.
- The removable top simplifies installation, inspection and repair. This is convenient if a future change in the power supply network or the addition of new wires is expected.
- Routes of this type cannot be curved. However, this fact is not a significant drawback. Certain problems may arise when the structure shrinks. However, such structures are not difficult to repair with the replacement of failed parts.


Correct installation of retro wiring in a wooden house
After carefully studying the information provided, we can make a preliminary conclusion about the complexity and high cost of installing internal systems. External installation options require good visibility. This makes it necessary to carefully select components that match the interior design.
This section examines the features of antique electrical wiring in a wooden house.

They look like antique items. However, the new models exactly comply with modern electrical standards. Instead of porcelain, lightweight plastic is sometimes used to make rollers. The most significant changes are in cable products. Nowadays, stranded conductors with double PVC insulation are used. The top fabric layer serves rather a decorative function.
Installing retro wiring in a wooden house is not accompanied by unnecessary difficulties. Such supports are quickly and accurately installed in the right places, even on uneven surfaces. This will be useful for equipping log buildings.
However, it should be noted that the cost of products of this type is quite high. To save money, retro wiring in a wooden house is installed in visible places. Plots in separate rooms are made using. Power equipment is connected separately, using internal lines in metal pipes.
Do-it-yourself reliable electrical wiring in a wooden house: step-by-step instructions with important comments
| Photo | Sequence of work, features of the main stages | |
 | Installation of electrical wiring in a wooden house is carried out after determining the power requirements. It will be useful to clarify the locations and operating features of consuming devices and prepare design documentation. | |
 | In order to correctly determine the implementation plan, you need to carefully study the aesthetic requirements and fire safety. Heat is dissipated by a short circuit in open space. | |
 | In an enclosed space, sparks will hit flammable material. The presence of sawdust and wood dust provokes a fire. | |
 | For these reasons, it is better to do the wiring in a wooden house with your own hands on the surface. | |
 | The second acceptable option is to create special, well-protected channels. | |
 | Install at the entrance | At large facilities, several distribution panels are installed. |
 | Wiring in a wooden house can be done using metal (plastic) corrugation in cable channels. | |
 | The hidden installation option (in steel pipes) is technologically more complex. | |
 | When forming such channels, it is necessary to ensure the tightness of the joints. The photo shows special wires that ensure the functionality of the potential equalization system. | |
 | It is easier to place such structures in interfloor spaces. | |
 | When installing one line, no more than 2 bends must be made so that the total sum of angles does not exceed 180°. The integrity of the shells during installation and the bending radius specified by the manufacturer should be maintained to prevent such damage from occurring. |
After laying the networks, the circuit, automatic protective devices, sockets and switches are connected. After checking and eliminating the identified faults, normal operation begins. Below we describe in detail how to make wiring in a wooden house. Step-by-step instructions explain the most complex typical work operations.
Which wire to use for wiring in the house to ensure a high level of security
A wide range of cable products means wide possibilities. But such diversity simultaneously increases the complexity of choice. To simplify the task, you need to determine in advance what kind of wire is needed for wiring in the house.
Products with aluminum conductors are designated by the letter “A” in the abbreviation. They are cheaper than copper ones, but have almost 2 times higher resistance. This metal oxidizes quickly, and the resulting film has low conductivity. Such wires can be damaged by bending. They cannot withstand long-term static loads, so you have to periodically tighten the screw contacts or equip them with special springs.
The only advantage of aluminum, low cost, must be taken into account in conjunction with the relatively low reliability of the network. Electrical wiring made from copper has better characteristics. But even in this case, you need to carefully study the important details. Stranded wires, for example, are resistant to repeated bending. However, this property is not needed for a fixed connection.

The designation shows the composition of the shells. The absence of an "A" means the core is made of copper. Below is a breakdown of individual modifications:
- flat shape in section - “P”;
- additives to the polymer that reduce flammability - “ng”;
- components in shells that reduce smoke emission during combustion - “LS”.
 The connection of copper and aluminum wires is made through a steel transition element to prevent heating of the electrical wiring and reduce the intensity of oxide formation
 Wooden houses are a very ancient tradition of Russian architecture. Even in our time, when there is no shortage of modern building materials, many owners of suburban areas prefer to build housing from wood - no one can even come close to it in terms of natural warmth and the special comfort it creates.
And ordinary city dwellers - owners of small dachas - most often choose wood as the main material for construction. But both permanent and temporary housing in modern conditions cannot do without power supply. In both cases, it is extremely necessary to know how to do the wiring in a wooden house correctly, so as not to endanger your health and even life, and to ensure the safety of your home and property.
Basic requirements for electrical wiring in a wooden house
First of all, it is necessary to warn home craftsmen who believe that if they can repair a socket or switch in an apartment and know how to distinguish zero from phase using a conventional indicator, then they can safely undertake independent installation of electrical wiring in a country wooden house. Not everything is so simple - a wooden structure is characterized by an increased fire hazard, and the requirements for laying power lines here are completely different.
 Poor electrical wiring is the most common cause of fires.
 Gloomy statistics show that the overwhelming number of fires that occur in wooden buildings are directly related to violations of the installation and operation of electrical appliances or wiring. By and large, you should not undertake the task of laying electrical lines yourself - this is the lot of qualified specialists. However, any owner of a wooden home needs to know the basic rules, although would in order to evaluate existing cable connections or monitor the work of called electricians, since it is quite possible to run into “hack workers” who perform the work according to the principle “no big deal, it’ll do.”
So, what are the basic requirements for electrical wiring in a wooden structure:
- The possibility of a cable fire with the transfer of an open flame to the wooden structure of the building in the event of a short circuit must be completely eliminated or minimized to the limit.
- The physical, technical and operational characteristics of the wires and electrical fittings used must sufficiently correspond to the total power consumption at each specific wiring section, taking into account peak loads. Any manifestations of heating of cables or terminal connections are unacceptable.
- The condition of the wiring must completely eliminate the risk of electric shock to people or pets.
The problem of aesthetics in a wooden building should fade into the background. There are many acceptable ways to solve this issue (this will be discussed below). But you should never improve the interior design of premises at the expense of even a slight reduction in the level of security - this is fraught with catastrophic consequences.
The difficulty of independent work on laying in a wooden house is also that there is no single regulatory document. Experienced craftsmen with extensive work experience know the basic requirements for it and technological techniques for their implementation. It is not so easy to select the necessary information yourself, scattered among SNiPs, GOSTs and PUE (rules for electrical installations), and it is often too specialized in nature, understandable only to a person with a specialized education.
The main objective of this publication is to give owners of wooden houses a basic understanding of how to install electrical wiring. It should not be considered as an instruction on how to make wiring in a wooden house, addressed to an unprepared person for completely independent electrical work.
Electrical line entry into the house
This — very responsible area, which for some reason owners often forget about, focusing specifically on the internal wiring. The principle probably works - it has been standing for a long time and is completely justified. Meanwhile, the introduction of power cables into the house could have been carried out a very long time ago, using old technologies that no longer meet modern requirements. The equipment of houses with electrical appliances has literally increased several times; accordingly, energy consumption has also increased. And the cable part itself can become hopelessly outdated - the insulation breaks under many years of exposure to the sun and temperature changes, exposing the metal cores and reducing the safety of the wiring.
 This type of cable entry through a wooden wall is a “time bomb”
 A particularly vulnerable area is the passage of the cable through the wooden wall of the attic. At one time it was believed that cutting a rubber hose was enough for safety. However, such a unit is fraught with a considerable threat - the rubber contains a considerable percentage of soot, which itself is carbon, i.e. conductive material. As such an “insulator” ages, electrical conductivity bridges with a fairly high resistivity appear. Areas of local heating and sparking may occur, and for dry roof gable boards this may be quite sufficient.
In a word, if the goal is to completely update the wiring and bring it to a truly safe state, then you need to start from here.
There are two ways to bring a power line into a house - overhead and underground.

- The underground method is considered more reliable, since the cable is completely hidden and not subject to external influences. At the same time, this is a rather expensive method that will require significant excavation work. The cable must be located at a depth of at least 0.8 m, the security zone must be marked with signs. Passage through the foundation and entry into the house is carried out with the mandatory installation of metal sleeves made of thick-walled pipes.

As a rule, it makes sense to organize such a connection only when thinking through the passage of communications in advance. If the power line is laid in an already rebuilt house, then it is easier and cheaper to use overhead wiring.
- It is strictly prohibited to carry out any independent electrical work on power line poles - only a highly qualified electrician with the appropriate permit has the right to do this.

An approximate diagram of the required placement of overhead wiring from power lines to the house is shown in the figure.

The section of the line from the pole to the house is usually made of wire with a cross-section of at least 16 mm. Basically, a SIP type cable (self-supporting insulated wire) is used, which has a high-strength sheath made of cross-linked polyethylene, resistant to infrared radiation and thermal shocks. The service life of such a wire should be at least 25 years.
However, this line never runs inside the house. According to existing rules, laying cables with aluminum current-carrying parts over combustible structural elements is strictly prohibited. And since we are talking about a wooden house, then starting from the entrance and to to The last socket or light bulb uses exclusively copper conductors.
For the section from the line connection to the input switchgear, it is recommended to use VVGng cable. The additional index “ng” indicates the non-flammability of its insulating coating. This cable fully meets the requirements for fixed wiring both indoors and outdoors. However, for greater reliability, it is also recommended to enclose it in a corrugated polymer pipe, which has the appropriate certification according to the current fire safety rules NPB 246-97. The plastic from which the “corrugation” is made is a self-extinguishing, non-combustible material.

Always carried out outside the building. Currently, special sealed clamps are most often used for this, ensuring reliable contact without the possibility of oxidation and sparking.
The areas where VVGng passes through the walls of the house and attic or interfloor ceilings are necessarily enclosed in a metal sleeve made from a thick-walled pipe. This precaution has several purposes:
- The cable part will be protected from damage that may be caused by displacements of building structures, for example, due to shrinkage of the house or ground vibrations.
- The metal sheath will prevent the spread of fire to wooden structures to the maximum extent in the event of an emergency - overheating or fire of the cable.
- The cable in vulnerable places hidden from view receives protection from domestic rodents.
Pipe wall thickness is a regulated value. So, if a wire with a cross-section of up to 4 mm² is used, it should be 2.8 mm, and when using more powerful cables - from 6 to 10 mm² - even 3.2 mm. This will eliminate the possibility of burning through the pipe wall if a short circuit occurs inside it.
The same rule applies to all areas of intra-house wiring in a wooden building, without any exception.
The next important section is from the entrance to the house to the switchboard (according to the accepted terminology, the input switchgear - VUR). What is special about this section is that it remains unprotected by automation from overloads or short circuits and, as a rule, is not in plain sight, often passing through the attic or utility rooms. You should not rely on the automation of an electrical substation - there are completely different response levels.
There are several ways to radically solve this problem:
- The entire section of the cable to the ASU can be enclosed in a metal pipe with the same parameters mentioned above. However, this becomes possible only if its length is small - up to 2.5 - 3 meters and the absence of a large number of turns. Push a fairly rigid cable over significant distances in the clearance T t of rubles will be simply impossible.
- It seems optimal to install a circuit breaker in a sealed box immediately before the line enters the building. In this case, its response threshold is selected one step higher than that of the main AZ, which is installed on the ASU. So, if a 25 A circuit breaker is installed on the panel, then 32 A should be installed on the outside one.

This will protect the vulnerable area from overload, but at the same time, if such a situation occurs in the internal house wiring, the automatic switch on the ASU will work, and there will be no need to get to the external AZ.
- There is another option, when electricity supply organizations place both the machine and energy consumption meters on the outer wall of the building or even on power line poles. This is, of course, reliable, but not always convenient for the owners of the house.
Installation of distribution panel
The line from the entrance to the house directly, without any branches, leads to the distribution panel - ASU. What are its main components:

- A metal or plastic box with places to place an electric meter and additional protection devices, a DIN rail for the AZ, busbars - neutral and ground loops. The dimensions of the box are not regulated, so it is better not to save in this case, and install it with the expectation of a further possible “upgrade” - retrofitting, the need for which may arise as the expansion progresses electrical equipment Houses.
- Sealed electricity consumption meter.
- The main input circuit breaker, two-pole or three-pole, which is usually also sealed by the power supply organization.
- Single-pole AZ mounted on DIN rail. Their number may vary. Typically, the electrical network of a house is divided into zones - each their They will correspond to their own machine of a certain power. Thus, a kitchen and one or several rooms are separated into separate zones, which can also be divided into lighting and a socket group. Often a separate zone is used for lighting the yard, power supply for the garage and outbuildings, and external sockets that are used for household work on the territory.
The power of the machines is calculated for each zone individually. They are guided by the rule that it should ensure operation in case of overload at the weakest section of the local electrical wiring. The lower the rating, the higher the safety of operating electrical appliances. So, if ordinary sockets have a permissible limit of 16 A, then the AZ should not exceed this value.
- RCD is a device for protective shutdown of power supply when a leakage current is detected. Due to the considerable cost of such a device, many simply neglect it. However, although it is not mandatory, it is still better not to skimp, purchase and include it in the general power supply system. The RCD will reliably protect residents from electric shock when using electrical appliances and will prevent emergency situations in the network. It is of particular importance in areas with high humidity - kitchens, bathrooms, bathhouses, boiler rooms, external fittings in courtyards, garages, etc. The selection of the RCD rating and its installation must be carried out by a qualified electrician, since several parameters are taken into account here - the total load of the area (maximum current) and leakage current.
An RCD can be installed on the entire intra-house network, but in this case there is a high probability of frequent false alarms, and in addition, it will be very difficult to identify the source of a potential security threat. A more convenient, but, however, more expensive way becomes installation RCD also has zoning, similar to AZ.
Video: example of installing an RCD
All hardware of the switchboard must be exclusively from trusted manufacturers and have appropriate certificates of conformity. It is important to remember that in many ways they are responsible for the safety of the owners and the safety of the building.
Prices for residual current devices (RCDs)
Residual current devices (RCDs)
How to make wiring in a wooden house - from the panel to the points of consumption
Now about one of the main points of wiring in a wooden house - the areas from the distribution board to the connection points for electrical appliances.
First of all, a few words about . Twisting must be avoided, even when using thick copper wires of the same cross-section. It is allowed to solder the wires and then cover the exposed part with plastic caps. The optimal solution would be to use special spring or screw terminal connections (for example, WAGO terminals). This is not so expensive, but will provide both reliable contact and the required protection against short circuits. In addition, such connections are easy to control and, if necessary, replace.

The optimal solution for a wooden house is an open arrangement of wiring on the walls. There are possibilities to place it hidden, but this will require large-scale and expensive work.
Methods for open wiring
- For a long time, it has been common practice to place internal wiring cables along wooden structural elements on insulating rollers, providing a safe gap of 10 mm from the wall.

In some old houses, such wiring has been preserved to this day.
 There are numerous fans of this retro style...
 By the way, this fastening method has begun to come back into fashion - many owners prefer this retro wiring. For this purpose, special twisted cables of various colors are even produced.
 ...and you can even purchase special wiring
 Video: retro wiring on wooden walls
However, such approaches should be taken seriously d It’s hardly appropriate to organize all the internal wiring. The number of electrical appliances and, accordingly, points of consumption in the average home has increased significantly, and laying many lines from the distribution board on rollers on top of the wall will look simply ridiculous.
- Single cables with a cross-section of less than 6 mm² can be placed directly on the wall surface, fixing them with electrical clips appropriate size. The main condition for this is the presence of double (or even better, triple) cable insulation. For such purposes, the already mentioned wires of the VVGng or NIM brand are suitable. If wires in conventional insulation are used, then a fireproof gasket (asbestos or metal) will be required, protruding from both sides of the cable by at least 10 mm, and this is unlikely to decorate the interior of the room.
- Electrical wiring can be placed in a polymer electrical pipe. The advantage of this approach is that several wires can be placed in one pipe. This will already look somewhat better than single cables, but still the aesthetics in this case are “lame” - the corrugation is not easy to place perfectly evenly, even with the use of clips. But the wires receive additional protection from external damage and the required gap from the wall is created.

For inconspicuous areas of wiring, for example, in utility or technical rooms, this method is probably optimal. However, it also has a drawback - if it is necessary to replace one cable, you will have to remove the corrugated lining from the entire bundle of wires.
Find out several available methods from our new article.
 A sleeve made of a metal pipe where the wires pass through the ceiling
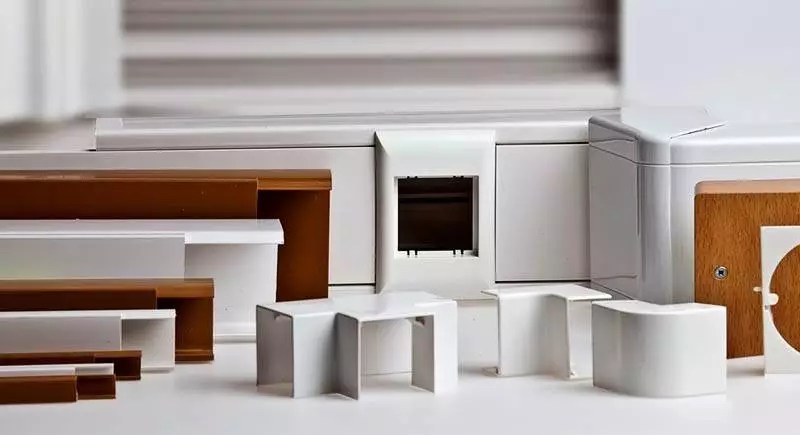
 - Polymers are becoming increasingly popular cable channels closed with a removable lid. They are produced in various sizes, that is, it is possible to select them for a single wire or for several parallel lines. They are made of non-flammable plastic, which increases the safety of the wiring.

Such boxes can be selected according to the most suitable color - they are not only white, but also tinted or having a decorative wood-like coating that will go well with the wall material.
A special advantage of such channels is the ease of maintenance or installation work with the cable part - you can always remove the cover to replace the problematic cable or add a new connection.

Considering that there are now many additional accessories for such cable channels– turns, external and internal corner elements, tees, plugs, etc., owners can use them to solve the problem of the required decorative wiring.
Video: open wiring in a wooden house using cable channels
- Another type of similar cable channels are systems of electrical skirting boards. They are also equipped with all the necessary elements for straight sections, turns, corners, climbs to sockets and switches, and junction boxes. This allows you to maintain the overall design style of the room, despite the fact that the wiring will essentially be considered open.

Important note - installation cable channels should be carried out only after the initial shrinkage of the house and provided that the wood of the walls is well dried. Otherwise, even minor changes in the “geometry” of the room can cause deformation and even destruction of the boxes.
- They also resort to placing open wiring in pipes, metal or polymer. Such a technology cannot be called convenient - each straight section is threaded separately, then a transition or rotary coupling is installed, and so on. Of course, the need to replace the cable part will also cause a lot of difficulties. This approach is more of a fashion statement, but not the optimal solution for outdoor wiring.
Sockets and switches installed with open wiring must have a fireproof gasket on the bottom. It’s good if this is provided for by their design itself. If not, you will have to cut out platforms from asbestos or metal.
You should immediately calculate the required number of sockets in a particular place in the room. The use of tees or extension cords during the operation of electrical appliances should be reduced to a minimum, or even better, completely eliminated.
Electric cable prices
Electrical cable
Hidden wiring in a wooden house

If the homeowners still prefer to completely hide the wiring, then they will be faced with very large-scale work.
- To ensure complete fire safety, all wires must be replaced with a fireproof sheath, which can only be steel or copper pipe. The internal cavity of a steel pipe must be either painted or galvanized to prevent corrosion of the walls.

- All transitions and turns are made using threaded elements or welding (soldering).
- The horizontal sections of the pipes must have a slight slope so that the condensate formed in the cavity has an outlet to the outside. Special openings are also provided in places where moisture accumulation is most likely.

- Only metal socket boxes are installed in the holes cut out for hidden placement of sockets and switches, which must be connected to the ground loop.

- All branches are carried out only in distribution boxes, which must also be tightly connected to the pipes.
- The entire pipe circuit must be grounded. to remove possible static voltage from it and prevent electric shock in the event of a possible breakdown of the cable insulation.

- To prevent contact of the wire insulation with the sharp edges of the pipe, a centering plastic plug must be installed at the outlet.
Video: placing hidden wiring in metal pipes
Hidden wiring is also allowed in one more way - by marking a plaster layer with a thickness of at least 10 mm. However, this is not used often, if only for the reasons that covering natural wood with plaster is probably not the best option.
If you look at photographs or videos posted on the Internet, you can see a lot of examples where hidden wiring is placed in metal or plastic, or simply bundles of wires are laid in grooves made in wood. What no matter what “authoritative” experts write, convincing that such a method is completely safe, this is a gross violation of existing requirements. It’s hardly worth planting such a “time bomb” in your wooden house - the stakes are too high!
The article mentioned the ground loop more than once. However, this issue is so unique and important that it deserves a completely separate detailed publication, which will certainly find its place on the pages of our portal.
Light, heat, the operation of engineering and household equipment - everything is based on electricity. Therefore, the level of comfort depends entirely on the uninterrupted and, importantly, safe operation of the electrical network. Any defect or mistake made during the installation of electrical equipment and electrical wiring can lead to dire consequences - fires or fires.
The topic of proper installation of electrical wiring for wooden houses is especially relevant, because... due to discrepancies in the interpretation of the PUE (Rules for the Construction of Electrical Installations) and the SP (Code of Rules), confusion and a lot of controversy arises. Therefore, in this article we will answer the following questions:
- What are the basic principles of installing electrical wiring in a wooden house?
- How electrical wiring is installed in a wooden house in accordance with the rules of the PUE and SP.
- Technical features of installation of hidden electrical wiring.
Correct electrical wiring in a wooden house
Wood is a general construction material with a centuries-old history. Both small guest houses and large-area cottages are built from it. Despite all the advantages of both log and frame houses, the basis of which are wooden posts, many believe that such buildings have an increased fire hazard. But one important point is missed.
Regardless of what the house is built from - brick, aerated concrete, timber or rounded logs, upholstered furniture, curtains, curtains, interior items, household appliances, etc. burn first. Those. - the “filling” of the house, made of combustible materials.
In a stone house, the electrical wiring running from the distribution board to the consumers is mounted in fireproof material (the cable is laid in grooves, which are then sealed and plastered, etc.).
In this case, the developer faces a difficult choice - the wiring in a wooden house can be external , the cable can be routed inside wooden walls or between frame posts.

How to lay cable in a wooden house.
Let's consider all these methods of laying wires in a wooden house. If in the first case the electrical wiring is visible, which affects the speed of detection of an emergency situation (cable overheating, etc.), then in the second option it is hidden behind the cladding or in solid wood. Accordingly, what happens to the cable is unclear. Hence the fears and doubts of the developer: “What if something happens to the electrical wiring? Will it light up or not?

Practice shows that the “weak” point in the electrical network is not the cable itself (we do not consider cases of gross violation of installation, the use of a cable with a reduced cross-section, on which a large load was “hung”, “twists” on electrical tape on the route to splice the cable), but connection points - junction boxes, terminals for connecting consumers, i.e. sockets, switches, etc.
Modern power cables, with the abbreviation VVGng, etc., do not support combustion.
There are constant debates about where it is safer to run the cable - outside or inside the walls, and whether open wiring is acceptable in a wooden house. There is an opinion that if we lay wiring along the wall, this will give us time to see and react to an emergency situation and make the right decision on how to proceed. Put out the fire or evacuate.
Simply put, smell the smoke immediately, and not later, when the flame has already spread to the structural elements. If the electrical wiring is mounted in the wall, even in a steel pipe, then this may also not save you from a fire.

Semik User FORUMHOUSE
I can refer to my experience as a firefighter and my experience as an electrician in emergency situations. Steel pipes are more needed for mechanical protection of wiring from the “fool”, the teeth of rats, which can gnaw even through a metal hose and damage the cable. I have seen more than once how a steel pipe, with wiring shorted inside, became red-hot. If this happens in a wooden wall, a fire is inevitable.
According to the user, the first thing you should think about when installing electrical wiring is the correct calculation of all cable sections and the selection of electrical equipment for protection. That is, figuratively speaking, there is no point in installing a 100 A circuit breaker on a wire with a cross-section of 0.75 square meters. mm with a distance to the consumer of one kilometer.

Hence, a safe electrical network is a balanced system where each element, from circuit breakers to the cross-section and length of the cable, as well as the end consumer, is matched to each other. It is a delusion to hope that by stretching a cable through a metal pipe in a conventional wooden wall, we have already protected ourselves from fire. The rules for laying cables in a wooden house are a rather vague thing, so far we have solved only part of the complex problem, which will be discussed below.
PUE and SP: standards and rules for installing electrical wiring in wooden and frame houses
Let us repeat once again that we have left outside the scope of this article the external installation of electrical wiring in cable ducts. We also do not consider the so-called retro wiring. This option, both in terms of design and financial component, is not suitable for everyone.

Therefore, we set the task - it is necessary to install hidden electrical wiring in a wooden or frame house in a safe and regulated way.
Which wire to use for a wooden house
It seems that everything is simple - you need to open the PUE (seventh edition dated 07/08/2002) and read paragraph 7.1.38, which says:
Electrical networks laid behind non-passable suspended ceilings and in partitions are considered as hidden electrical wiring and should be carried out: behind ceilings and in the voids of partitions made of flammable materials in metal pipes, having localization ability, and in closed boxes; behind ceilings and in partitions made of non-combustible materials - pipes and ducts made of non-flammable materials, as well as flame retardant cables. It must be possible to replace wires and cables.
Now we open the document for frame builders, namely SP 31-105-2002 “Design and construction of energy-efficient single-apartment residential buildings with a wooden frame.” Read paragraph 13.5.1:
Electrical wiring should be arranged by passing cables (wires in a protective sheath) through voids or spaces filled with insulation inside the walls and ceilings of the house, as well as through holes in the wooden frame elements of walls and ceilings. Pass such cables and wires through house structures it is allowed to arrange without the use of bushings and tubes.
And paragraph 13.5.2:
For electrical wiring Insulated wires in protective sheaths must be used or cables in sheaths made of flame retardant materials.
- A cable is two or more insulated conductors connected together and covered with insulation.

- A wire is a single-core or multi-core conductor with or without insulation.

Cable for wiring in a wooden house.
Accordingly: due to discrepancies between the PUE and the joint venture and the vagueness of the wording in the PUE, many users have a question - how to properly install electrical wiring on flammable materials. As prescribed in the PUE - by laying it in a steel pipe. Or as it is written in the joint venture - using a flame retardant cable without additional protective sheaths. Many disputes arise on this basis.

Vitalik1985 User FORUMHOUSE
I think that laying cables in steel pipes- this is a redundant solution. The likelihood that a cable will break is negligible; fires most often occur due to a spark in an outlet. It is better to pay more attention to circuit breakers, connections, junction boxes, switches, etc.


Danil117 User FORUMHOUSE
It is necessary to do so to eliminate the possibility of the wire catching fire. We choose the correct cable cross-section and select high-quality machines. That is, we do not hope that a steel pipe is a panacea for fires and fires.

We will also consider opposing opinions.

Sollara User FORUMHOUSE
I believe that wires for a wooden house should be in a metal pipe with localization ability. If the wire catches fire, it will burn out inside. If it is shorted, the arc will not burn through the pipe. We install metal junction boxes connected to the pipe.

A steel pipe for electrical wiring in a wooden house must be grounded.
Also interesting is the opinion of a portal user with the nickname Ivanov Kostya.

By laying a cable in a metal pipe, we solve two problems: we protect the cable from possible mechanical damage and protect the tree from possible fire of the cable.
Moreover, the first point acquires key importance in relation to our construction conditions. Workers can, while installing drywall or drilling something, pierce an unprotected cable with a screw or nail. The cable insulation can be damaged by the sharp edge of the metal profile. The cable can be chewed (optionally) by rats or mice. In addition, the accumulation of wood dust during a spark or breakdown of insulation can lead to the rapid spread of flames inside the walls.
It seems that such a solution is redundant, but in this way we protect the cable from force majeure circumstances, including the common situation: “I forgot where the cable goes in the wall, hung a shelf/picture and damaged it.”
Although, in order to avoid such situations, we do not lay the cable as it is necessary, but along strictly defined and marked cable routes, if necessary, taking photographs with an attached tape measure.
Is corrugation acceptable for electrical wiring in a wooden house?
From all of the above, it becomes clear that some FORUMHOUSE users believe that electric cable in wooden houses, with hidden wiring should be carried out only in metal pipes. Let's emphasize - specifically in steel pipes, and not in a metal hose, plastic self-extinguishing corrugation or steel corrugated pipe.
Corrugation for wires in a wooden house with hidden wiring is not suitable!

A short circuit (short circuit) arc burns through a steel corrugated pipe, and plastic corrugation, due to its fragility, will not save the wiring from mechanical damage.
Others believe that a metal pipe for electrical wiring in a wooden house is redundant and rely on foreign experience, which allows for a cable in a log. In a classic frame using North American technology, the electrical cable is pulled directly through wooden posts, in drilled technological holes, without corrugations, metal pipes, etc.

In the “Finnish” version of the frame, the electrical cable is usually pulled in the inner layer of counter-insulation, embedded in a wooden counter-lattice.

It seems that the technology can be repeated, because it has stood the test of time, but, as we know, the essence is in the details.
“Overseas”, grounding must be done, and double grounding - one goes to the street line, to the switchboard, the second is independent, connected either to copper pins driven into the ground, or to a central water pipe. Plus, there is also a “zero” bus, and each line and electrical appliance (sockets, lamps, etc.) has its own independent grounding.

Roracotta FORUMHOUSE Member
There are 4 thick cables running underground to the meter in the house. Ground, zero and two phases. In addition to this ground on the cable, the central panel and meter itself must be grounded with a separate ground or to a copper pipe when entering the house, or with two 16 mm copper pins 2 meters long, or with a special copper plate buried in the ground to a depth of about a meter.
In a three-core “foreign” cable, the copper wire is “ground” and comes without braid. This ensures that the RCD is triggered at the slightest damage to the insulation of the “zero” and “phase” wires along the entire route. While in our country the grounding wire is isolated and provides protection only to end consumers.

Roracotta
In Canada, a rule was introduced - all lines that supply bedrooms must be equipped with special circuit breakers that are sensitive to sparks jumping at the consumer (plug, socket, etc.). If a spark jumps somewhere, the machine knocks out. It's expensive, but it needs to be done.
And this is only part of the nuances that ensure electrical safety. Having decided to run a cable in a steel pipe in houses built from timber, we remember that wood shrinks over time. Moreover, depending on the moisture content of the source material, this value can be significant. This means that we need to think in advance about how to ensure the necessary movement/independence of the steel pipe with the cable, so that the beam does not “hang” on it after 2-3 years.

Condensation may form in the steel pipe, and moisture may enter the outlet or junction box due to the slope of the route. Another “headache” is how to build tracks in large wooden houses. It’s one thing to lay steel pipes in a wooden cottage of 100-150 square meters. m, but the task is completely different in complexity - in houses of 300-500 sq. m. In addition to increasing the estimate, special requirements are also placed on the qualifications of workers involved in the installation of electrical wiring in steel pipes.
Therefore, examples of the practical implementation of cable wiring in metal pipes are interesting.

Ivanov Kostya Member of FORUMHOUSE
I installed the electrical wiring in the wooden ceiling of the attic floor, in a steel square pipe 15x15 mm, with a VVGng cable with a section of 3x2.5. Turns and bends - a metal hose with a diameter of 20 mm, it fits well onto the pipe.


A square pipe is more convenient to install than a round one.
Installation of wiring in a log house
Electrical installation in a wooden house is also interesting , made by user with nickname Serg177. To do this, he bought a 15x15 mm pipe 300 meters long and a metal corrugation with a diameter of 2 cm, as well as brackets (they are used to fasten corrugations with a diameter of 1.5 cm) for fixing the pipes on the walls. Next, we install the wiring, not forgetting to first clean the edges of the pipes from burrs!
A wooden house pleases its residents with lightness and indescribable comfort. But wood, for all its advantages, is a flammable material that requires increased attention from the point of view of fire safety. But since the need to equip a house with electricity is not discussed today, before starting work, you need to carefully read the rules for installing electrical equipment (PUE) and the provisions of GOSTs. There are no particular difficulties in following these rules, but you need to know about them.
Basic requirements for electrical wiring in a wooden house
Codes of rules PUE and SNiP are developed by specialists in the field of safety. This is not the whim of an office official, but a list of necessary standards, compliance with which brings the level of “carelessness” as close as possible to the desired one. We can say that life itself writes these dry chapters, behind which human tragedies are sometimes hidden.
The main cause of fires in wooden buildings is electrical short circuit.
Fire statistics, unfortunately, leave no doubt that wood construction is always on the front line of fire risk. However, if we remember that for hundreds (and maybe thousands) of years our ancestors lived in wooden log houses, there is hope that everything is possible, you just need to competently deal with the wiring. After all, it is this that in the vast majority of cases becomes the cause of fire.
The basic requirements contained in the PUE and GOSTs are as follows:
- The wiring calculation should be made with a margin of up to 30%. This concerns, first of all, the selection of the cross-sectional area of the wires, since this determines the degree of heating of the insulation and the likelihood of a short circuit during operation. To cover the whole picture of electrification as a whole, it is necessary to prepare a working project with a detailed diagram and specification of electrical wiring, and upon completion of the work, undergo certification and receive a wiring passport.
- The quality of the connections should not allow the slightest possibility of electric shock to the residents of the house.
- Heating and ignition of cables is unacceptable, as this will most likely lead to the arson of the entire house. The possibility of short circuits must be completely excluded.
The PUE encourages the installation of lighting in wooden houses using 12-volt lamps and LED equipment, which is considered the safest today. For example, in mines and mines, especially in those where there are accumulations of methane gas, and an explosion can occur from a single spark, all equipment is powered by a current of 12 volts. The same thing is done in cars.
A significant obstacle that makes it difficult to independently carry out work on installing wiring in a wooden house is the lack of a single document regulating the installation. The main regulations are dispersed in the normative documents of GOST and SNiP and are not systematized. Therefore, when drawing up a project, it is better to contact a specialized organization that has a license for this type of activity.
Preparation of a power supply project
Project documentation must include all details of future wiring. It displays the location of lighting fixtures, sockets, mounting boxes, and distribution boards. The specification describes in detail the brands of conductors used for wiring, their total number and nominal characteristics. All electrical devices involved in the power supply circuit, such as an electric meter, RAM, automatic machines and others, are calculated in advance to ensure compliance with the loads expected during operation.
 An electrical supply project usually includes a wiring diagram indicating the markings of the cables used, the type of devices to be installed and the calculated load on each of them
 The presence of a project is a sign of a civilized and responsible approach to business.
You can, of course, route the cables without it, but:
- practice shows that installing wiring without a preliminary design usually costs 10–15% more. At the same time, errors are possible, the correction of which also costs money;
- In the event of a fire, the insurance company will require a certified home electrification plan. In its absence, damage coverage will be delayed indefinitely (until the circumstances are clarified). It's good if only one house burns down. In densely populated areas, a fire can spread to neighboring areas. The culprit will be the owner of the wooden structure from where the fire began to spread. The only way to prove your non-involvement is to present a certified plan for the electrification of the premises;
- Having a plan significantly reduces the cost of preventative and repair work on electrical wiring during further operation, and also helps to quickly find and eliminate the source of damage to the power supply.
A full-fledged project consists not only of drawings, but also of a detailed description of all elements and equipment. It usually includes:
- A graphic representation of all levels of living space, on which, using accepted symbols, the locations of cable routes, consumers and electrical equipment are reflected.
- Single-line electricity supply diagrams.
- Detailed calculations of grounding loops.
- Cross-sectional area of conductors.
- List of switching devices.
- Maximum current and voltage of the meter.
- Calculations of power of electrical receiving devices.
In addition, the project must provide for external lighting of the site and the connection of courtyard buildings - bathhouses, garages, utility rooms.
 The electrical wiring project for a private house must contain a calculation and diagram of the installation of external lighting in the adjacent area
 Project documentation is developed in several stages:
- Formulation of the problem. Power supply is planned in accordance with the technical specifications and conditions. The customer expresses his vision to the contractor orally or using a diagram. As one of the options, a design project can serve as an order form.
- Development and approval of the project. If necessary, the project is protected and approved by representatives of inspection organizations. The parameters of electrification and their compliance with regulatory documentation are being clarified.
- Project implementation support. Sometimes it is also called installation supervision, during which the designer directly monitors the execution of the work.
Calculation of cable cross-section
Calculation of conductors consists of determining two parameters:

In conditions of increased fire safety requirements, the rules require the mandatory use of three-core wires. This measure is dictated by the need for protective grounding of the entire power supply system.
 In private houses, wiring should be done with a three-core cable: one core is the phase wire, the second is neutral, the third is grounding
 Table: selection of cable cross-section depending on current strength
| Cable cross-section laid openly | Single-phase connection, 220 V | Three-phase connection, 380 V | Section of the cable laid in the pipe | ||
| Continuous current when the cable is heated to 60 o C | power, kWt | Continuous current when the cable is heated to 60 o C | power, kWt | ||
| 0,5 | 10 | 2,2 | |||
| 0,75 | 13 | 2,8 | |||
| 1 | 15 | 3,3 | 12 | 8 | 1,5 |
| 1,5 | 20 | 4,4 | 18 | 12 | 2,5 |
| 2,5 | 30 | 6,6 | 27 | 18 | 4 |
| 4 | 40 | 8,8 | 35 | 23 | 6 |
| 6 | 50 | 11 | 45 | 30 | 10 |
| 10 | 75 | 16,5 | 65 | 43 | 16 |
Calculation of electrical installation devices
Electrical installation devices - sockets, switches and distribution boxes are selected based on the technological conditions of their operation.

Selection of input cable and circuit breaker at the input
Proper electrical input into the home is of great importance in ensuring the safety of electrical wiring. When choosing a cable and a circuit breaker, you should take into account that in the future the load on it will only increase - the number of household appliances and units that are used at home increases over time.
 The cross-section of the input cable must be calculated for the future: over time, the number of electrical devices used and their total power consumption will only increase
 The electrician's task is to choose a cable that will ensure the use of electrical devices without the risk of overvoltage of the input conductor. The optimal placement of the input circuit breaker (AB) is considered to be its location in front of the meter. Its task is to turn off the internal network in case of excessive current consumption, for example, during a short circuit. But at the same time, it should not turn off at the maximum permissible load. In order to calculate the rating of the input AV independently, use the formula I nom = P/U x cos(f), where I nom is the rated current, P is the total power of all devices, cos(f) is the power factor, which for most electrical appliances can be considered equal to one. 10% is added to the resulting rated current value and the circuit breaker is selected relative to it. Most often, in a private house, an AB with a nominal value of 25 A is sufficient.
 The input circuit breaker must withstand the maximum load from all switched on electrical appliances, but open the network when too high currents appear, for example, from a short circuit
 Three-phase power supply for a private house
The vast majority of wooden houses use single-phase power. But if you plan to use high-power units - for example, powerful electric welding or woodworking machines - a three-phase current supply is required. In this case, to calculate the installation devices, you need to contact a specialist. Calculations are made using more complex formulas and in relation to a specific situation.
Do-it-yourself electrical wiring in a wooden house
If you have an agreed project, completed in accordance with all legal standards, you can install the electrical wiring yourself. To do this, you need to stock up on the necessary tools and materials, as well as familiarize yourself with safety regulations. Let's consider the main stages of home electrification.
Installation of distribution board
The distribution board is the main control point for electrical energy. It is a cabinet containing devices for monitoring and metering current consumption. Can be metal or made of dielectric plastic.
 The distribution panel contains control and monitoring devices for the electrical network: meters, circuit breakers, residual current devices, etc.
 The shield is mounted in a place convenient for use, at a height of 1.5 to 1.7 m from the floor surface. Most often, it is placed near the front door in such a way that when leaving you can turn off the electricity, and when returning you can turn it on. An input cable is connected from the power lines to the switchboard, and then the electricity is distributed throughout the house. The following is installed inside the shield:
- electricity consumption meter;
- circuit breakers on DIN rail;
- RCD (residual current device);
- buses for grounding and neutral circuit output.
An input circuit breaker can also be located here, but it is also practiced to locate it outside the house at the point where the overhead line is connected to the home network. This option is not without meaning, since the risk of excessive load on the input cable is significantly reduced.
Installation of the distribution board is done first. Particular attention should be paid to the selection of automation, using proven and reliable brands of devices from well-known manufacturers.
Video: review of a switchboard for a private home
Cable entry indoors
There are two options for introducing the cable from the power line into the house.
- An aerial method that uses a self-supporting insulated conductor.
- Underground method, when the cable is brought into the room from underground.
The first option is more common due to its speed and efficiency. The second one is more expensive, but has a number of advantages, such as long service life and independence from atmospheric disasters.
 The underground cable entry method is more labor-intensive, but more reliable and durable
 In any case, the rules require that the cable be inserted into a wooden house through a metal thick-walled (from 2.5 to 3.3 mm) pipe. Its interior must be painted or galvanized, and the installation is carried out at an angle of 3–5 o to the horizontal plane so that the resulting condensate can flow out freely (GOST R 50571.15–97 (IEC 364 5 52 93): clause 522.3.2).
 The cable is inserted into a wooden house through a metal sleeve, which is placed at an angle to organize condensate drainage.
 The installation of the metal sleeve and the cable entry are always carried out from the outside of the wall. The installer must have the appropriate qualifications and approval. Most often, this work is performed by employees of the energy supply organization.
Video: introducing cable into the house and connecting to the switchboard
Installation of switches and sockets
In wooden buildings there are certain nuances in the installation of switches and sockets.
- If hidden wiring is installed, the socket boxes, in accordance with the PUE, must only be metal. Despite the fact that the contact pair of modern switches is securely hidden inside a plastic (or ceramic) base, a microspark occurs every time the device is used. The same thing happens in a socket when a plug is plugged into it. In ordinary stone walls this is not dangerous. But in dry wood, in which wood dust can also accumulate, such a spark can lead to the most unforeseen consequences.
 In wooden houses, hidden wiring can be done, but all electrical devices must be installed in metal socket boxes
 - For external wiring, when cables approach sockets and switches along the surface of the wall, it is necessary to use dielectric plates that separate the device from the wood. This should not be neglected; it is better to think in advance about how to make such a lining aesthetically pleasing. Retail chains offer a wide variety of protective platforms for every taste and color, from plastic to metal. According to the rules, the size of the platform should cover the wall by 10 cm on each side (counted from the base).
 For safety reasons during external wiring, electrical devices are placed on dielectric plates
Otherwise, the installation of sockets and switches is no different from installation in a stone building.
- First, the wall is marked. It is best to use a building level or a laser level.
- Next, socket boxes or protective platforms are installed.
- The device base is mounted on them.
- After connecting to the wires, the outer casing is attached.
All of the above applies to distribution boxes. It is recommended to design wiring in such a way as to reduce their number to a minimum.
Connecting wires
Based on the same premises of increased fire hazard, it is recommended that conductor connections in wooden buildings be made using factory terminal blocks. Twisting is allowed only in case of additional soldering of current-carrying conductors and using plastic caps.
 Wire connections must be made using special terminal blocks; twists can only be used as a last resort
 Grounding and installation of RCDs
A residual current device (RCD) is designed to protect humans (and pets) from electric shock in the event of a possible leak on damaged insulation or the metal casing of household appliances.
 In the electrical wiring diagram in a private house, it is necessary to provide for the presence of an RCD device that protects against electric shock in case of accidental leaks
 The device is capable of detecting minimal leakage and responding to it by opening the circuit. The level of sensitivity depends on the brand of the device. The choice is made according to the main parameter - leakage current, which is expressed in milliamps. If the RCD is included in the whole house protection scheme, a leakage current value of 30 mA is sufficient. If the device is intended to protect individual rooms, for example, a bathroom or toilet, select a higher sensitivity of 10 mA. An RCD is installed in the distribution board. The connection diagram provides for the location of the RCD in front of the circuit breakers.
 The residual current device for the general circuit of the house is selected for a leakage current of 30 mA
 Video: connecting a circuit breaker and an RCD
The same tasks are assigned to grounding all electrical installations inside the house. Separately, we can say about the grounding device. In order for the stray current drainage system to work properly, you need to follow the recommendations for independently installing a grounding strip.
 The grounding loop consists of three metal plates fixed to reinforcing pins
 To do this, you will need three-meter-long metal fittings and three-meter sections of corners.

Do not forget about the seasonal expansion and contraction of metal under the influence of changing air temperatures.
To prevent the grounding bus from being broken, a “compensation hump” is made in it, which is designed to absorb thermal changes.
Methods for open wiring
In practice, three types of external wiring are used in wooden houses:
- Corrugated wiring. The cables run inside a plastic or metal corrugated sleeve. The advantage of such wiring is the low cost of materials and speed of installation. The corrugation is attached to ceilings and walls using special clips. The disadvantage is the ability of corrugated hoses to accumulate dust, which is difficult to remove from them. In addition, over time, the wiring may sag and needs to be tightened.
 Laying cables in corrugated hoses is very simple and convenient
 - Wiring in cable channels. One of the most popular types of wiring today. This is due to the fact that recently manufacturers have begun to produce a large assortment of connecting fittings, with which you can route wires in any configuration without compromising the appearance. The main advantage of this type of wiring is affordability, speed of installation and high level of maintainability. This sets cable channels apart from corrugated cables, which will have to be completely replaced if the wiring is repaired. A big advantage of wiring in cable channels is the availability of cables and the ability to update them if necessary. The only thing to remember when installing cable channels is the shrinkage of the house. Freshly built wooden houses experience significant (up to 5% per year) shrinkage. This means that the wiring lines may become deformed.
 Wiring in the cable channel allows you to have access to cables at any time
 - Retro style wiring. Quite a popular trend in interior design. It consists in the fact that the wires are fixed to the walls using ceramic insulators in an open way. The cable is twisted in the manner of a twisted pair and in this form is pulled to lamps or sockets. The solution is not new, this is how wires were laid in residential premises 60–70 years ago, but it perfectly complies with safety standards - the cable does not touch the wall, remaining at a distance of 10 mm from the surface.
 Retro wiring looks very aesthetically pleasing and fully complies with electrical safety standards
The choice depends entirely on the aesthetic inclinations of the residents of the house. All the necessary materials are available for sale to realize your preferences in terms of design solutions.
Video: external wiring in a cable channel in a wooden house
Hidden electrical wiring in a wooden house
If for some reason the customer is not satisfied with the external location of the wiring in the house, the cables are routed in a hidden way. In a wooden structure this is a rather labor-intensive and painstaking procedure. Each wire, regardless of its thickness, must be packaged in a metal pipe. Socket boxes and distribution boxes must also be made of metal. The pipes are supposed to be protected from corrosion. To do this, they must be painted from the inside with moisture-resistant enamels, and small holes must be drilled at certain intervals to drain condensate. For the same purpose, it is necessary to place the pipe at a slope so that drops of moisture can flow out. To avoid damage to the insulation, the ends of the pipes are cleaned of sharp burrs and additionally equipped with plastic tips.
 To install hidden wiring in a wooden house, cables inside the walls are laid in metal pipes and brought out into niches covered with metal sockets.
 - The optimal material for such wiring is considered to be copper pipe. Its cost is quite high, but due to the plasticity of the metal, bends can be made without special equipment. Steel pipe is much cheaper, and threaded adapters and bends are provided to give it the required shape.
 Steel pipes are cheaper than copper pipes, and there are special fittings for bending them.
 - If the wiring is installed during the construction stage, hiding it in the walls is simplified. Especially if it is a frame structure. In houses made of logs or timber, all wiring channels are cut out in the walls after they are built.
 To lay cables in wooden walls, you can cut grooves
 - Another method allowed by the PUE standards for wooden buildings is to locate the wiring inside the plaster applied on top of the wood. This method was practiced in old buildings - shingles (plywood reinforcement) were stuffed onto the logs and a layer of cement plaster was thrown on. According to the rules, the layer of plaster in this case should be at least 10 mm on all sides. A modern analogue of this technology is covering a wooden wall with plasterboard, which is essentially dry plaster. With a standard plasterboard sheet thickness of 12.5 mm, the wall needs to be covered in two layers.
 If you place a sheet of gypsum board on top of a wooden wall or ceiling, hidden wiring can be done underneath it
The big disadvantage of hidden wiring in a wooden structure is the inaccessibility of the cables. If any problems occur, replacing the old cable with a new one will be very difficult. Nevertheless, this type of wiring has its fans. Especially among designers who are primarily concerned with the aesthetic design of the home.
Video: hidden wiring in a wooden frame
Wiring test
After completing the installation, the customer needs to invite employees of the electrical laboratory. The purpose of the test is to measure the resistance of the system as a whole, grounding resistance and check all automation: RCDs, circuit breakers, current flow meter. If all parameters comply with the standard, the customer receives a protocol signed by the responsible person. This document is presented to the service company when concluding an agreement to supply the facility with electricity.
 After completion of the work, it is necessary to invite a specialist to check the system and obtain a test report for the electrical wiring.
 When carrying out wiring installation activities yourself, it is important to observe personal safety measures. Electric shock can cause irreparable harm to health and cause death. Installation is carried out only when the power supply is turned off. Commissioning of equipment is carried out in the presence of an authorized representative of the design organization.
Installing electrical wiring in a wooden house is a more important undertaking than laying conductive routes in a brick or concrete structure. This is due to the specifics of the material: wood burns, even if it is impregnated with a composition that prevents ignition from an accidental coal.
The importance of correct installation
The temperature of the electric arc, which occurs when a short circuit of conductors carrying a current of standard 220 V, can reach 5000 °C (!). No fire-prevention impregnation helps against the temperature that melts steel.
 Despite this, wiring in a log house made of rounded logs or a frame country house is often done “carelessly,” if not carelessly.
This is usually motivated by a reluctance to tinker a lot with the dacha, where they live for two to three months a year. But you should understand: poorly made internal wiring of a wooden house can leave you without this very house.
Please note that “poor quality” primarily means “not according to the rules provided for a wooden house.” The usual practice of installing a household electrical network in an apartment or brick house is not suitable for a wooden one due to the flammability of the building material.
What the regulations say
The rules for the construction of electrical installations - PUE - give an unambiguous answer to this question. Hidden wiring in the voids of partitions made of flammable materials is permissible only in metal pipes that have the property of localization.
SNiP gives a more vague formulation, so it is recommended to be guided by the PUE. By flammable material we mean wood, even if it has fire-resistant impregnation.
Under the metal pipe is a steel or copper pipe of square or round profile, having a regulated wall thickness of at least 2.8 mm for any cable with a conductor cross-section of up to 4 mm.
For cables with a cross section of 6-10 mm, the pipe wall thickness should be 3.2 mm.
In this case, it is forbidden to tightly “clog” the pipe with cables - the cable should occupy no more than 40% of the clearance.
To insert a cable from a power line into a wooden house, only a thick-walled steel sleeve is used.
This requirement is due to the following situation. If a short circuit occurs due to a cable breakdown, only a thick-walled pipe can withstand the flash until it self-extinguishes or the circuit breaker is triggered.
The use of metal hoses or other “armor” made of corrugated metal or plastic for hidden wiring in a wooden house is unacceptable for the following reasons:

The main “unofficial” rule for high-quality wiring in log wooden houses is the prevalence of safety over external beauty.
Laying in pipes
Laying wiring in steel or copper pipes, observing the requirements specified above, is possible only at the stage of building a house from scratch.
For example, when installing electrical wiring in a house made of laminated veneer lumber, the installation of a system of such pipes, junction boxes and sockets (also metal) is carried out at the stage of installing the frame.

The rules for hidden wiring of power cables in a wooden house do not allow laying the cable in metal or plastic corrugation in sawn grooves. inside the walls of a wooden house in thick-walled pipes is acceptable, but difficult due to the need to bend pipes and make complex connections using couplings, fittings or welding.
There are a number of requirements that must be met when installing hidden wiring in a wooden house.
 The inner surface of steel pipes must be painted or galvanized to prevent corrosion, copper pipes must be painted to protect against oxides.
The use of a metal hose/steel corrugation on bends and transitions makes the entire structure meaningless - transitions are provided with threaded connections or butt-to-butt welding.
Horizontally, electrical wiring pipes in a wooden house are laid at a slight angle to allow condensation to escape; at the lowest point, a hole is made for liquid drainage (not inside the wall). The entire system is provided with a grounding connection that is separate from the grounding provided by the wiring.
In wooden houses, only metal sockets are used for sockets and switches. The connections between the junction box and the pipes entering it must be sealed.
To avoid damage to the cable sheath by a sharp edge when exiting the pipe, the edge must be rolled or provided with a protective plastic plug.
Open wiring - installation features
If a wooden house has already been built, but there is a need to replace the wiring in it, then this can be done without sawing grooves in wooden partitions, which are often not very thick and strong themselves.
Let us remind you that aluminum wire, the most popular among electricians in past years, is categorically unacceptable in a wooden house due to its tendency to fracture and fire hazard.
Open wiring in a wooden house is quite possible. Here are some options.
You can run the cable directly along the wall of the house, enclosing it in standard plastic corrugation or metal flexible armor.
The open method allows this wiring method, since the source of fire in the event of a short circuit will be immediately visible. There will be no fire inside the wall.
Wall mounting is carried out with ordinary corrugation clips.
 Wiring in standard cable channels is the same method as for an apartment, only a non-flammable asbestos or, for example, felt gasket must be provided between the cable channel and the wooden wall. A variation of such wiring is wiring disguised as a baseboard.
A fresh look at old methods. The wiring is mounted on the wall of a wooden house using ceramic or plastic (non-flammable) insulators, maintaining a clearance of at least 10 mm from the wall.
A special, “antique” twisted power cable and sockets of the same style are used.
An open installation of a system made of metal pipes is also possible.
Advantages and disadvantages of open installation
All these wiring methods for a wooden house have their advantages and disadvantages. Installing wiring on a wooden wall of a house in a corrugated pipe is the easiest way; there are no problems with wiring in the junction box.
The downside is that this method is unaesthetic, as well as the need to remove the entire corrugated pipe in order to gain access to one cable.
In this regard, the cable channel is preferable, fortunately, now on the market you can find the color of the box “like wood”, and choose an individual shade to match the color of your internal coating.
The cable channel is convenient for installation - it is easy to open and close, and is relatively safe for a wooden house, since it itself is made of non-flammable plastic.
If desired, you can hide the wires by selecting the “bottom” wiring in the cable channel, disguised as a baseboard.
Please note that it is unacceptable to embed wires under a real baseboard!
 Lighting or connecting sockets with a load of no more than 16 A can be done using “antique” wiring.
For this purpose, specially stylized wires, insulators between the wall and the wire, sockets, and the like are produced. But keep in mind that for a powerful load like a welding machine, you need to provide an outlet to which a suitable cable with a cross-section of at least 2.5 mm is connected.
General installation rules
Open wiring in a wooden house must be carried out in compliance with the following standards:
- the point of entry of the cable from the power line into the wall, as well as the point of passage of the cable through the internal ceilings only in thick-walled metal sleeves;
- the distance from the cable to the wall when installed in an open way is not less than 10 mm;
- Grounding must be installed;
- Only a cable with a non-flammable sheath is used;
- socket boxes and distribution boxes in a wooden house are made only of metal;
- connecting wires to each other only in mounting boxes, and only using spring/screw terminals or soldered twist, which is closed with a casing or cap;
- Unsoldered twisting is unacceptable.
It is imperative to install an RCD for protection against leakage currents, as well as separate circuit breakers for short circuit protection for each group of consumers.
Cable selection
An important stage of wiring work is the selection of the main cable. Choosing the right cable for wiring means solving the main problem regarding the safety of a wooden house.
According to modern requirements, a so-called SIP cable - a self-supporting insulated wire - is used to extend from the power line to the house.
It uses aluminum conductors with a cross-section of at least 16 mm, and also contains a steel reinforcing cable (for rigidity).
The sheath of this cable is designed to withstand exposure to adverse external factors for a minimum of 25 years.

But the SIP cable can only be laid up to the wall of a wooden house. On the outside of the wall, through special insulators, or better yet, hermetically sealed clamps, it is connected to a copper cable, for example VVGng (ng - non-flammable).
The VVGng section is selected as standard - 1.5 mm for the lighting line, 2.5 mm for household appliances, 4 mm for powerful consumers such as an electric stove, electric heating line or welding machine.
Direct twisting of aluminum SIP conductors with copper conductors of internal wiring is prohibited.
Only copper is used for wiring inside a wooden house. When choosing a brand of wire, use either the already mentioned VVGng, VVGng(P) marked “GOST”.
These types of single-core copper cables are equipped with double non-flammable insulation, while having sufficient flexibility for convenient internal wiring.
You can use a German NYM cable - it is equipped with triple non-flammable insulation.
Switchboard design
The general distribution board for wiring in a wooden house must have a metal casing.
Inside the switchboard there is an input circuit breaker, an electric meter, and one or more RCDs (depending on the number of groups of internal consumers). There are also circuit breakers responsible for individual groups - the same number as the RCD.
It is the automation that is responsible for protecting the wiring from short circuits and current leakage, which can lead to electric shock. There are rules for calculating the choice of protective devices based on characteristics, and it is better to leave this choice to a professional.
But it is worth knowing that in most cases the rules are as follows. Power consumption should not exceed 5.5 kW, the general input circuit breaker is single-phase, 25 A, type C.
The machines are installed according to separate consumer groups (selected according to the wire cross-section). A 16A circuit breaker must be installed on a cable with a cross-section of 1.5 mm (lighting). For a 2.5 mm cable - 20A.

There are separate rules for selecting RCDs. The main one is that the current limit for an RCD should be an order of magnitude less than for a machine.
That is, a 16 A machine is equipped with a 20 A RCD, and so on. Three-phase input for wiring in a wooden house is used very rarely.